
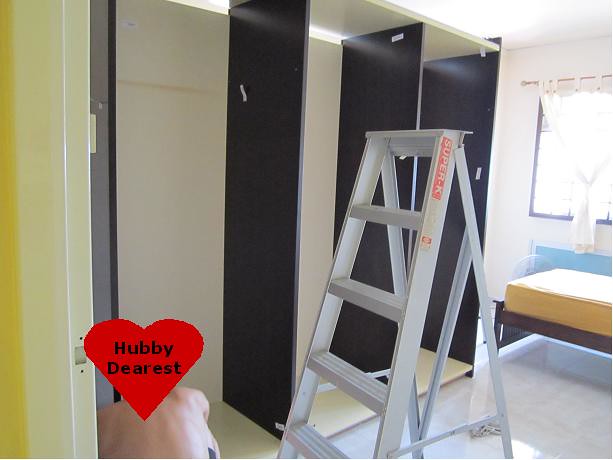
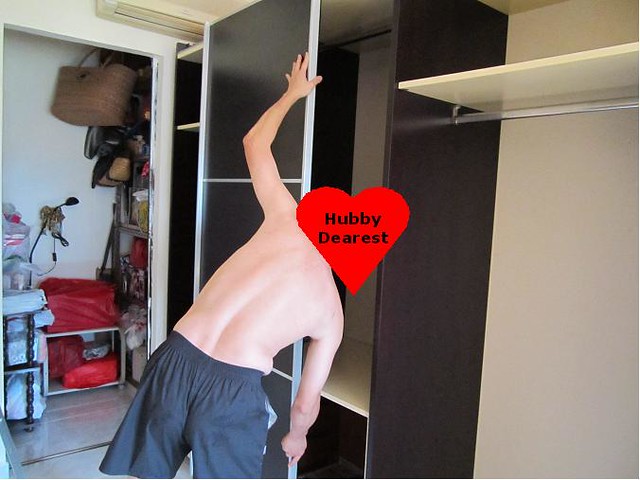
(A tongue-in-cheek candid photo of my hubby)
Needless to say, his spouse (that's me!) might have overlooked the benefits of monetary savings as a result of DIY which is commonly practiced in western countries whereby 3rd party repairs weren't readily available in view of the unpredictable weather changes & other geographical issues e.g. having to drive 8 hours to reach one's destination, etc.
I could never fully appreciate his DIY abilities when I felt that contractors were readily available here in Singapore to carry out home-related assignments. As such, you could easily imagine an eye-goggling moment for myself as a spouse when he told me that he wanted to install our chimney hood in the kitchen as he felt that it was a breeze!
Now that I have newly created this blog on our home, I would be publishing some back-dated DIY "assignments" which had been proudly accomplished by hubby dearest. Some of these "assignments" were published earlier on in the Renotalk forum. However, I have decided to migrate these write-ups to my blog since the links of some of these threads had been "lost" under my username in the forum.
We hope that you enjoyed reading them as much as my hubby did for his DIY works at home! :)
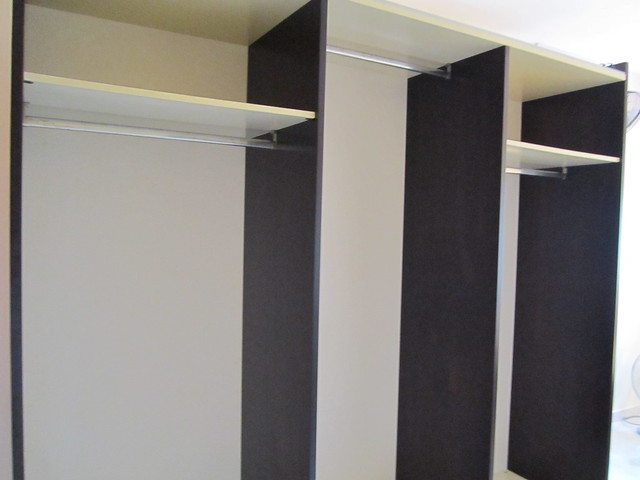
My Hubby's dangerous stunt with our BARANG BARANG wardrobe
Before our cement contractor, Ah Cheong restored both bedrooms to HDB's original condition, the centre of our 2-in-1 super large MBR (which was amalgamated to the common room) was saddled with a giant wardrobe that was bought from BARANG BARANG during their good old days in year 2000.(please refer to the corresponding link for restoration works conducted to our bedrooms : http://barbettey.blogspot.com/2012/05/demolition-fabrication-of-walls-in.html)
This was a feat accomplished by my hubby becox it was a mammoth for a wardrobe even during such times - at 94"(W) x 86"(H) x 27"(D). It is nothing like IKEA's lightweight, flimsy concept for a wardrobe.
I almost have to dial 995 for an ambulance when he was stuck below the cabinet frame when it landed directly on him after he commanded me to push it down with all my strength!!! *SOB*
And the quality and workmanship of those days were
relatively impressive becox they were made to last for eons. It was nothing like the IKEA quality that u see in their
showrooms now becox our version from Barang Barang back in year 2000, had a
very high threshold for heavy weights and pricing back then for such styles & quality were extremely expensive.
When it was first delivered to us by Barang Barang, the
furniture establishment had to mobilise 1 installer and 2 assistants to get the
item installed manually with powered drills in our then extra-large MBR (master
bedroom).
The decision for us to restore both MBR and common room
to their original layout built by HDB instead of its amalgamated state, meant that we were compelled to
relocate this giant wardrobe.
My hubby had decided to take a risk in taking it apart on
his own. I had my reservations becox it
was dangerous & it risk damaging my wardrobe. :(
I had also questioned how this is possible becox none of us
had carpentry or installation experience. That's apart from installing light-weight pine wood racks & perhaps some small-scale drawers from IKEA.
And I wished that I was able to take photos of him bringing down
the giantic wardrobe but I didn't have any chances as my hands were required to
help him out during the dismantling.
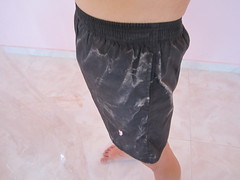
This was how his shorts looked like after he successfully
dismantled the mammoth of a wardrobe:
We're affectionately nicknaming this giant wardrobe The MAMMOTH.
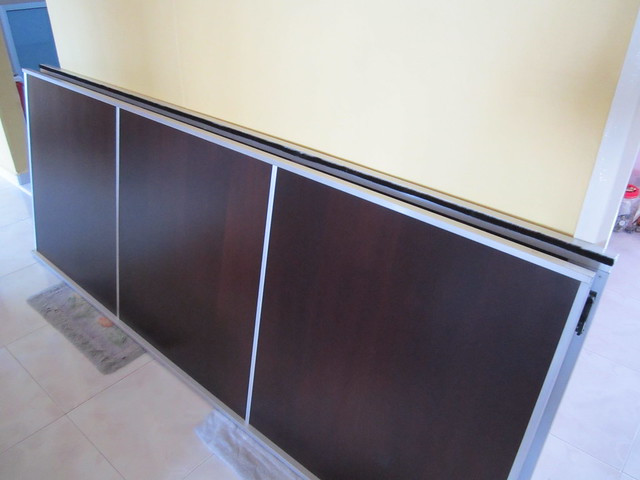
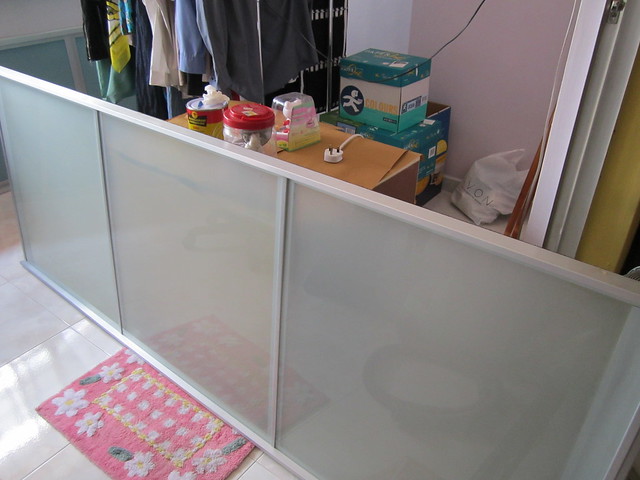
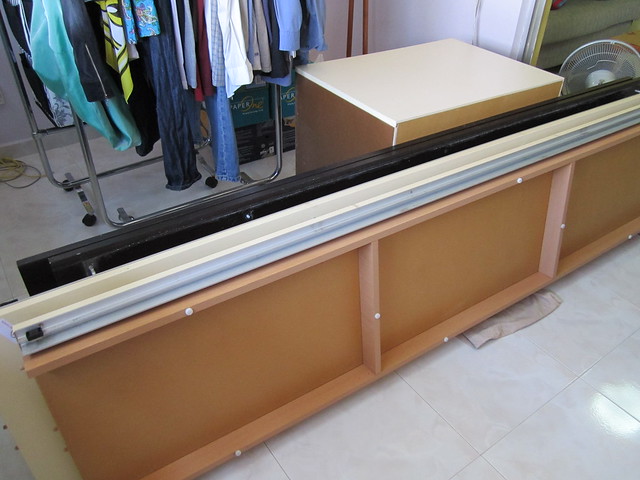
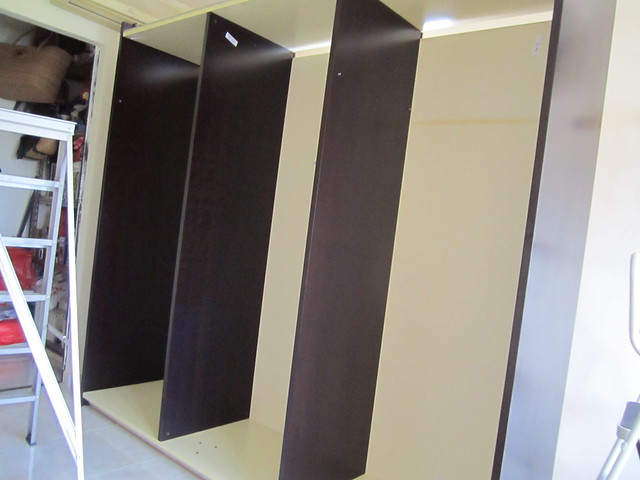
Here are photos of some components of The MAMMOTH after it had been taken apart by my hubby...
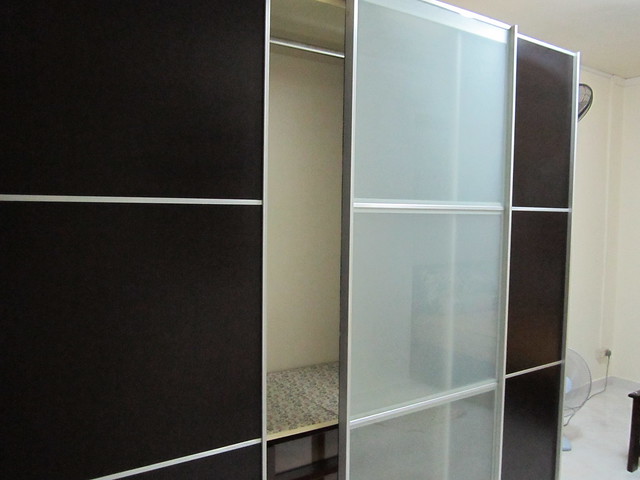
The 2 panels of wooden sliding doors:
The sandblasted glass panel (sliding door) which still
looked beautiful without any stains even after 10 years:
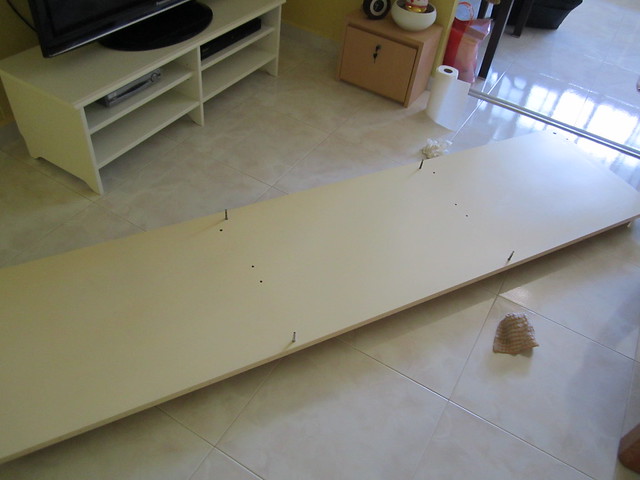
The base and sides of the wardrobe:
This photo features the supposedly heavy-duty rollers of the
sandblasted glass door of The Mammoth:
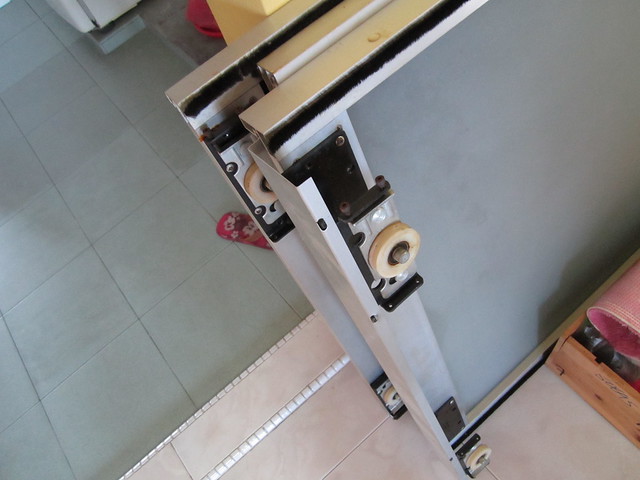
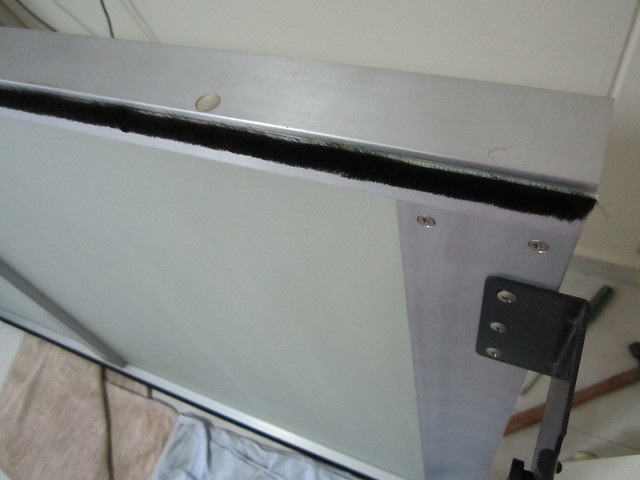
We discovered that the strip of dust-guard (not sure what
it's known as but it's for keeping out lizards & whatever that would crawl
in between the gaps) lining the sandblasted glass door is peeling off as the
glue holding it there had hardened and disintegrated with age.
So my hubby had applied a thin layer of Kangaroo brand glue
which is also commonly used by carpenters for sticking formica boards onto
wooden furnitures.
The glue quality seems to be pretty good becox the dust
guard had a sturdy hold onto the metal frame & thus far, it hadn't peeled
off yet:
To illustrate how good the quality of The Mammoth is even
though it is 10 years old, these photos show the 4 drawers which are lined with
glass panels on the front:

The installation process wasn't as terrible & scary as
the dismantling of The Mammoth.
However, it wasn't a breeze as well becox it wasn't as
straight forward as we thought it was.
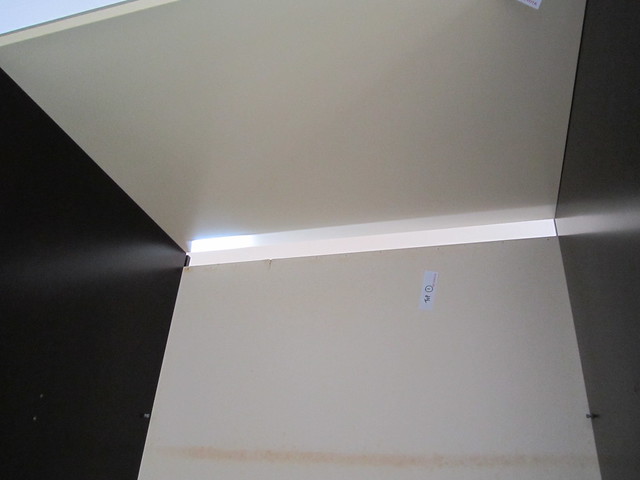
After my hubby set the base down onto its new location i.e.
in the existing common room where the storeroom door opens from within, we
realised that it was odd that the top of the cabinet couldn't be aligned to the
vertical panels that formed the frame of The Mammoth.
This is the photo of the top of The Mammoth where you
can see that there are metal screws sitting on it. My hubby had explained to me that those metal screws served as
the male components which will hold the vertical panels together to form most
of the wooden cabinets frames.
Anyways, during this process of dismantling &
assembling, we were both so stressed up becox The Mammoth was so bulky and
heavy and this was indeed my hubby's first attempt in doing such stuff.
I started nagging at him becox I didn't agree to a DIY stunt
in the first place. And it was a
terrible relief when he managed to crawl out from under THE MAMMOTH after it was "timber-fallen" when he told me to push it down.
I felt that he should have hired a professional
instead. So during his stunts, it was
also a session of shouting matches between the 2 of us.
Eventually, he sent me down on an errand of buying tea for
him. And when I returned from the trip,
I was surprised to see that he managed to rectify the alignment of The
MAMMOTH's frame.
So here comes the photos of the installation process...
My hubby's attempt in realigning the vertical panels
flanking both sides of the frame:
Managing to get the alignment rectified:
There were "roofing" gaps seen between the boards
on the back of the frame and its rooftop as shown in the photos below:
But this was easily solved when my hubby adjusted the boards
in sliding them upwards and nailing them in place with tiny nails - they looked
really fine in dimension.
Here comes the HERO's photos while he nailed them in place:
And there comes the railings for clothes, which were indeed
made of very very high quality stainless steel. Not only were there no rust spots after 10 years in a bedroom
that is frequently airconditioned & with a toilet, it was able to withstand
the weight of all my clothes which were bursting out of THE MAMMOTH:
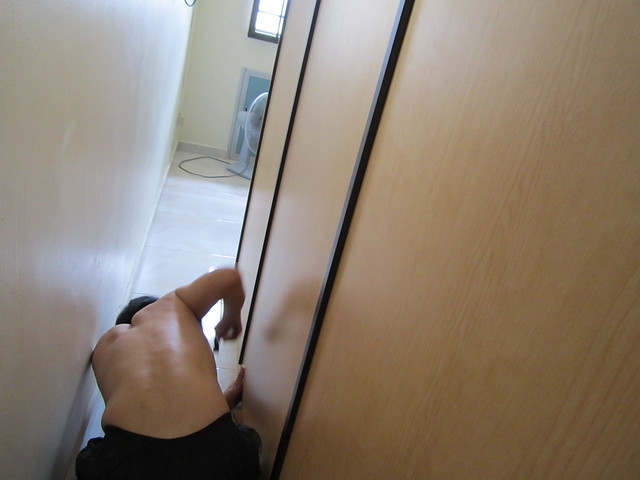
My hubby installing the sliding doors:
The wooden paneled doors had to be adjusted on both sides
using allen keys to that the drawers at the centre compartment could be drawn
out easily without crashing into the metal frame of the sandblasted glass door.

But while he was at it, he shoo-ed me out of the bedroom as
my nagging & fussing was too much of a bad distraction. So no chance for taking any snapshots of it.
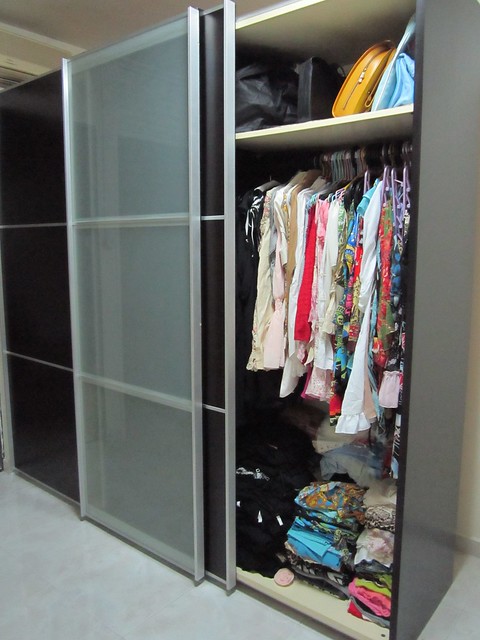
At last, the finished product: THE MAMMOTH reinstated at its new location!
And the accents of THE MAMMOTH at its new location,
including Crabtree & Evelyn's drawer liners which had a thick waxy layer on
the reverse side, which would last for a very very long time without
disintegrating:

IKEA's MALLA series of boxes and storage systems with
compartments for storing away some of my towels, pillow cases, accessories,
etc:
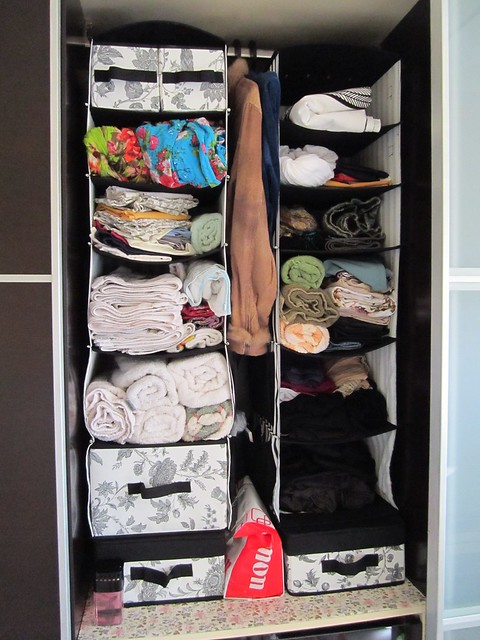
And finally, my clothings, bags, hair care products, etc
To pen-off in conclusion of this stressful episode of
relocating such heavy furnishings, we are keeping our fingers crossed that this
will be the first & last time of attempting such dangerous stunts.
Here are extra shots of him dismantling & putting away
our super-King sized bedframe measuring at 190cm x 200cm. It was our matrimonial bed which we bought
from Barang Barang in year 2000 when we first got married.
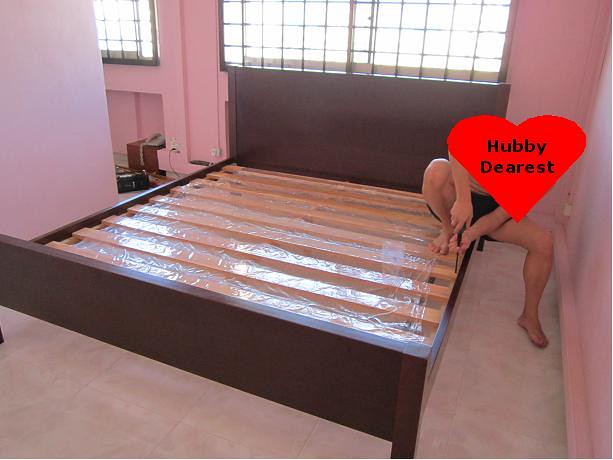
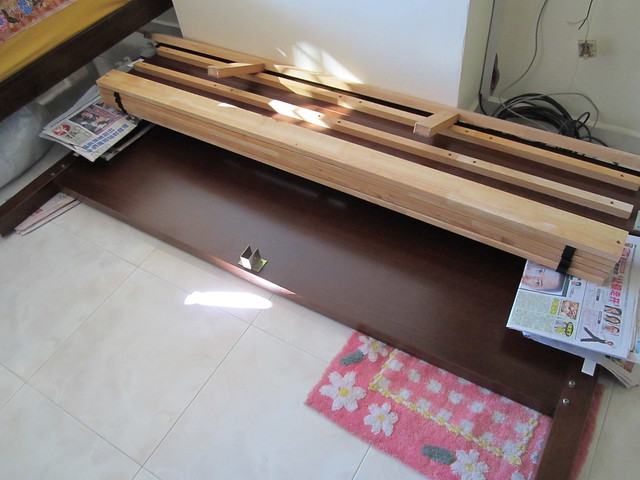
It was made of solid wood and is so sturdy & heavy that we had to use a DIY trolley to wheel its headboard into the same bedroom which is
currently housing THE MAMMOTH.
Both of us were itching to replace the bedframe when we
visited furniture retailers but there was simply no chances becox it's still
doing well even after 10 years. It
looked brandnew without any scratches, scuffmarks. No cracks at all even though my flat is subjected to the hot
afternoon sun.
Post-mortem comments:
Jux some mushy remarks over here...
My hubby chided me for calling him a silly old man, ambitious freak, smart aleck, etc when he had difficulties in dismantling & reassembling THE MAMMOTH ...
And eventually I saluted him as a HERO after his
stunt was successful...
He shook his head in disbelief and commented at how fickle
women could be with their men. And even
snorted like a lizard would with the tsk! tsk! tsk! sound...
That was funny... kekekekeke :D
DIY with Formica
We had a row of swing door cabinets sitting on a common
cabinet base and because of space constraints in view of our flat layout, my
hubby had decided to separate these 3 cabinets. Meaning that they could be used as stand-alones instead of being
co-joined as a 3-in-1 cabinet.
It did occur to us that we should be getting a carpenter to
do the job. However, after checking
through the costs of assigning such jobs to a carpenter, it seemed to be pretty
expensive. The reason being that every contractor would expect to earn a minimum sum that is deemed acceptable in beefing up one's profit margin when conducting a business.
And because we didn't know
of any reliable carpenters, my hubby whose a self-proclaimed DIY expert, decided to take matters into his own hands. i.e.
to fabricate individual base for ALL 3 cabinets.
My usual response was to worry.
In such an instance, I got worried with stability issues
pertaining to the cabinets. Afterall, I
didn't believe that a layman like himself could accomplish such a job of
creating a cabinet base. My hubby was
badly harassed by my incessant questioning of his "prowess" to
accomplish the assignment.
And as usual, he emerged the winner when I gave in to his
demands to DIY those 3 sets of cabinet base.
He promised me that if he failed to create those cabinet
"leggings", he would then let me call in a professional carpenter to
do the job.
Outcome:
It was a jaw-dropping moment for me. He
succeeded in creating those 3 sets of cabinet base. Much to my surprise...
How we started off...
We went down to LIAN KIM YONG CONSTRUCTION PTE LTD @ 37
Defu Lane 10 #01-75 (TEL: 62877467) to purchase nyatoh wood beadings.
All the wood beadings in the shop are extremely long. Unless we had our own long vehicle to
transport them back home, it was impossible to even bring it up into the car
due to its length.
As such, we had tried to persuade the lady & guy at Lian
Kim Yong Construction to saw them up into the require sizing for fabricating
our cabinet base. However, both of then
told us that they do not provide such services to their customers.
The lady told us that she could provide us with a huge saw
& 2 plastic stools so that we could cut up the nyatoh beadings on our
own. My hubby sweat it out over 15
minutes and the nyatoh beadings were finally cut down to the required
lengths. There were quite a number of
workers from neighbouring workshops who stared on as they walked past LIAN KIM
YONG while my hubby slogged through the arduous process.
The lady (sorry cannot recall her name) was kind enough to
pass me tissue papers, which I used to dab the sweat off my hubby's face.
:P She also assured us that we could
pay her according to the number of nyatoh beadings my hubby had cut down with
her saw.
After we paid the bill, she stacked the shortened nyatoh
beadings & wrapped them in plastic films which had been commonly used for
packaging purposes or protecting furnitures during transportation.
By the time we boarded the bus with the mini stack of nyatoh
beadings, I mux make this mushy comment that my hubby had been proclaimed a
real HERO to saw them up to precision & so neatly without much jagged
edges.
Postscript: I
wished that I had taken some photographs of the process of sawing up those
nyatoh beadings. However, the purchase
of those beadings were impromptu. As
such, I didn't bring along my camera so no photographs could be taken of my
hubby going through that process of trimming down those huge lengths of nyatoh
beadings.
Putting things together...
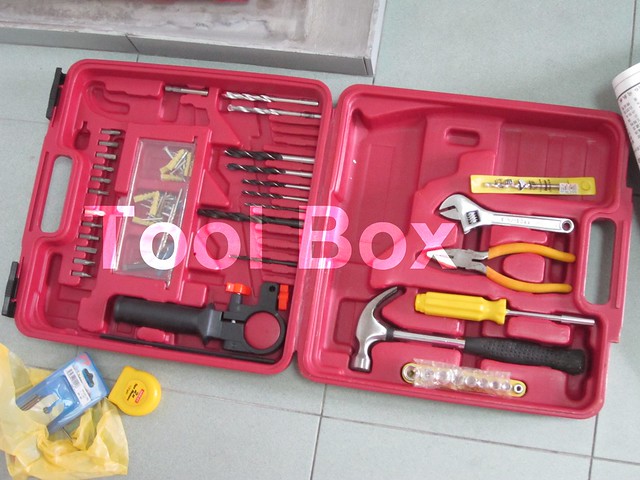
A power drill & assortment of tools are required.


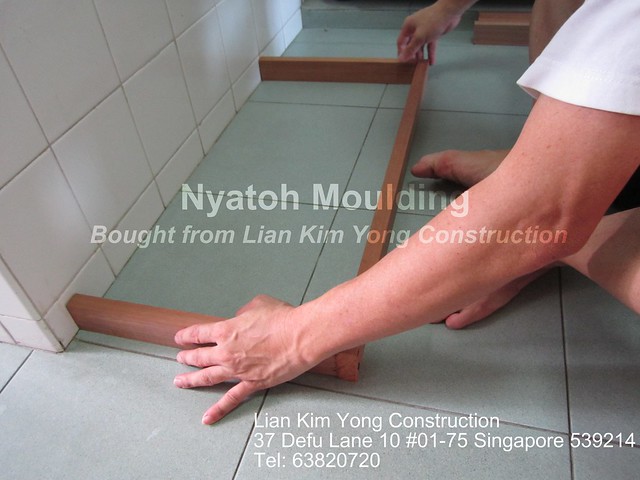
A longer length of nyatoh beading was placed against 2 other
shorter lengths of nyatoh beadings; and held against the kitchen wall prior to
drilling as shown in the photograph below:
My hubby did some measurement with a ruler and using a
pencil, he marked a line onto the longer length of nyatoh beading so that he
could use that as a basis for drilling.
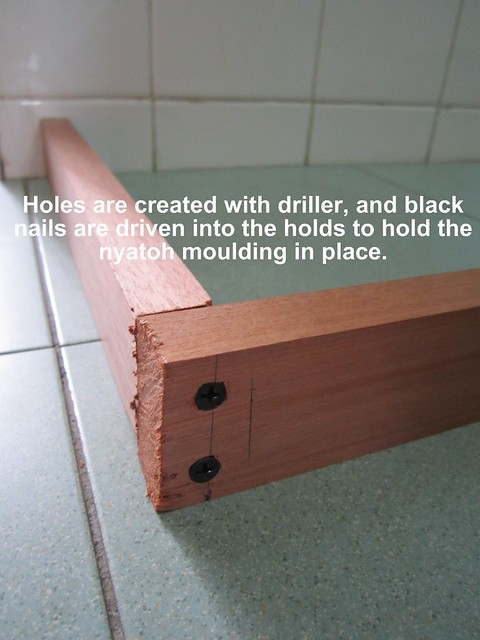
Holes were then created by the power driller as shown in the
photograph below:

Nails were then driven into the newly created holes to hold
the nyatoh beadings together:
If u guys were to ask me if the fabrication process was a
breeze, the answer is an absolute NO.
My hubby had detected that one of the shorter nyatoh beading
was significantly shorter than its counterparts. He improvised this shortfall in length by using electrical
trunking left over by our electrician during relocation of power points.
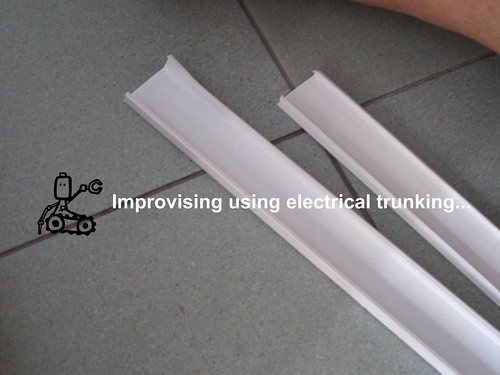
And this was how it looked like after he had trimmed off a
strip of the electrical trunking, inserted it in place before he did the
necessary to hold the beadings & that little strip of trunking in place:
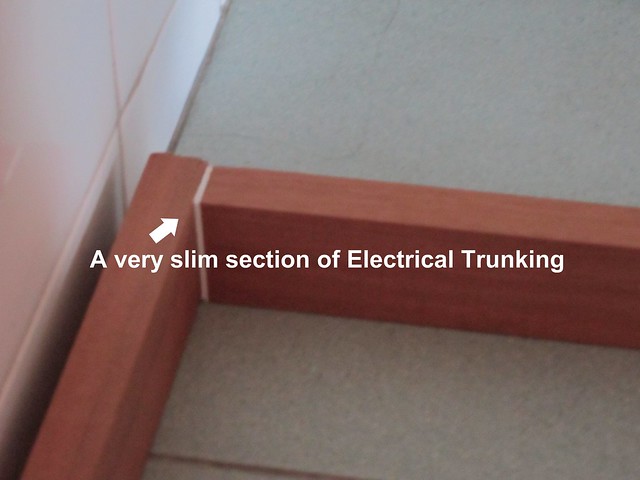
I thought that he was very creative & smart in
improvising the nyatoh cabinet base using electrical trunking!
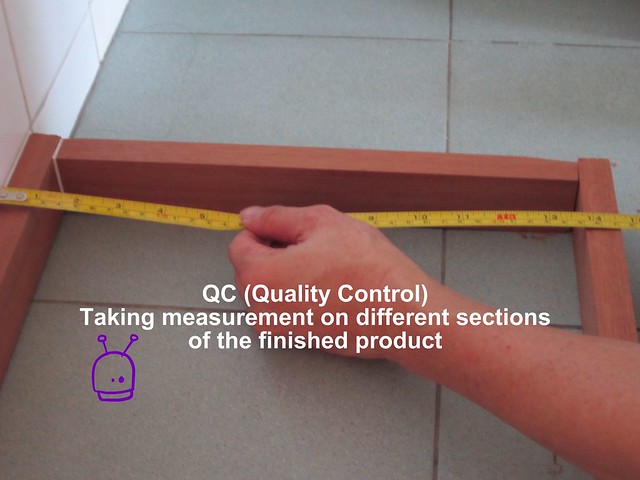
After the completion of each cabinet base, my hubby took
measurements along different sections of the finished product.
He told me that this was his idea of quality control to
ensure that there wasn't any irregularity in terms of sizing across each
individual cabinet base. Otherwise,
there would be stability issues when each cabinet sat wobbly onto its base.
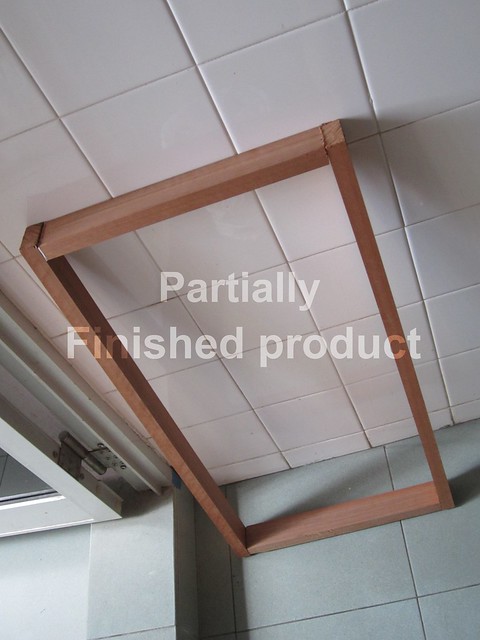
This photograph shows how the cabinet base would look like
after the different lengths of nyatoh beadings had been placed together:
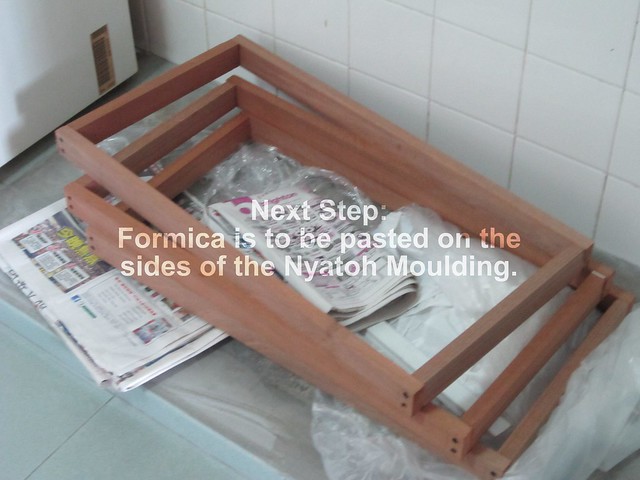
"Dressing up" the nyatoh cabinet base...
After the nyatoh cabinet base has been fabricated as shown
in the photograph below, formica would be pasted along the sides facing out.
We managed to purchase formica of the same print from JENNINGS
at Defu Lane (their block is directly opposite LIAN KIM YONG). But lugging huge roles of formica was
challenging becox JENNINGS do not provide delivery & we were on our own
after we paid up for the formica.
The staff simply rolled up the wide sheets of formica that
we bought from them by tying raffia string.
The formica were rolled up such that they had wide diameters. We requested that they repack it such that
the formica was coiled up tightly into a slimmer roll. That would facilitate carrying it up any
vehicle.
However, we were told that in doing so, the formica would
crack & break off by the time we reach home.
Fortunately, a cab that ran into our path looked huge enough
to accomodate both my hubby & myself, with that huge roll of formica being
placed on our laps. In view of its
weight, I earned myself 2 huge bruises, 1 on each fleshy lap! :(
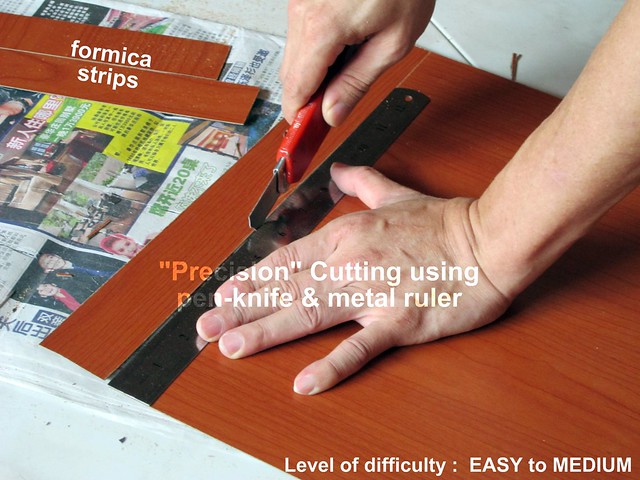
Unwanted newspapers were then placed onto our floor tiles
& after careful measurements, my hubby cut up strips of formica using a
huge pen-knife & a metal ruler.
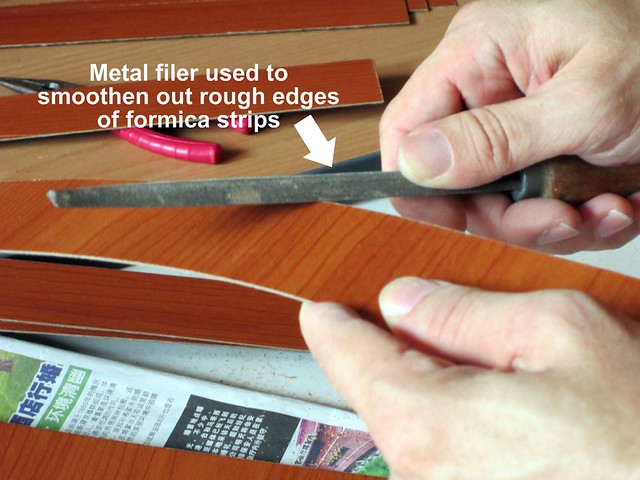
And becox we didn't have cutters used by the professionals
in the carpentry industry, my hubby improvised the smoothening of rough or
fraying edges of the formica by using a metal filer as shown in the photograph
below:
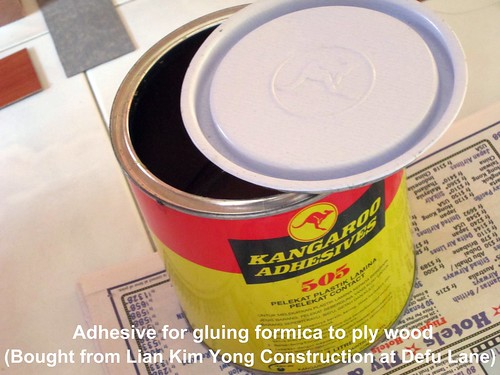
Apart from the nytaoh wood beadings, I would also like to
mention that we bought adhesive for pasting formica from LIAN KIM YONG.
Although Jennings recommended the Tiger brand adhesive glue,
we only required a small tin of the product.
As such, we bought the kangaroo brand adhesive which came in a smaller
calibration.
The photograph below shows the tin of kangaroo brand
adhesive from LIAN KIM YONG:
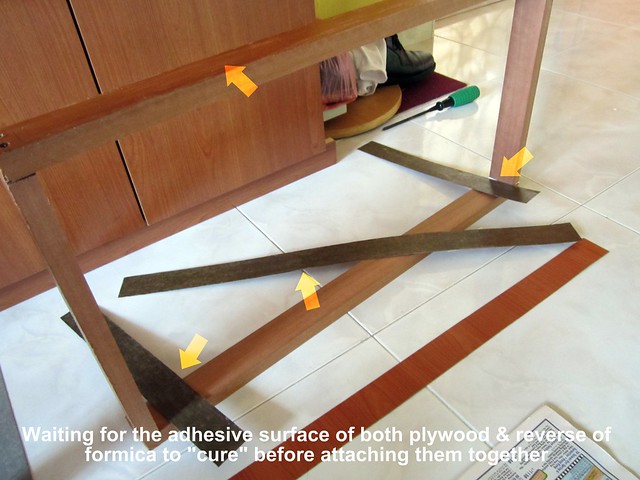
A thin layer of adhesive is applied onto the exterior
surface of the newly constructed cabinet base and left to "cure"
partially prior to mounting any formica on it.
In our case, we use an unwanted wooden spatula which came
with our bodyshop products eons ago. A
ice cream stick could be used as well or any other gadgets so long as u could
butter up the area with a thin layer of adhesive.

While we waited for the thin adhesive film on the cabinet
base to "cure", my hubby started applying thin layers of adhesive
onto the reverse side of the newly cut formica strips as shown in the
photograph below:
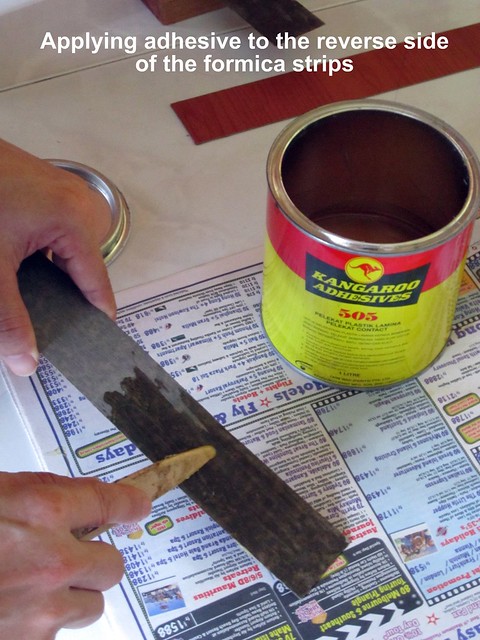
The photograph below shows strips of formica with adhesive
applied to it and according to my hubby, he claimed that the adhesive works
best after time to give for it to partially "cure" before attaching
the formica to the nyatoh cabinet base.
U will also notice that the photograph shows one of the
cabinet sitting on a larger existing cabinet base. We will be taking separating these 3 cabinets by taking them off
the base & placing each on its own newly created base so that each could be
placed in different bedrooms.
When the adhesived sides of the formica strips & the
nyatoh cabinet base are almost "cured", the adhesived surface at
sticky to touch like how a piece of scotchtape would feel when you touch the
sticky side of it.
The formica strips are carefully mounted onto the adhesived
sides of the nyatoh cabinet base as shown in the photograph below.
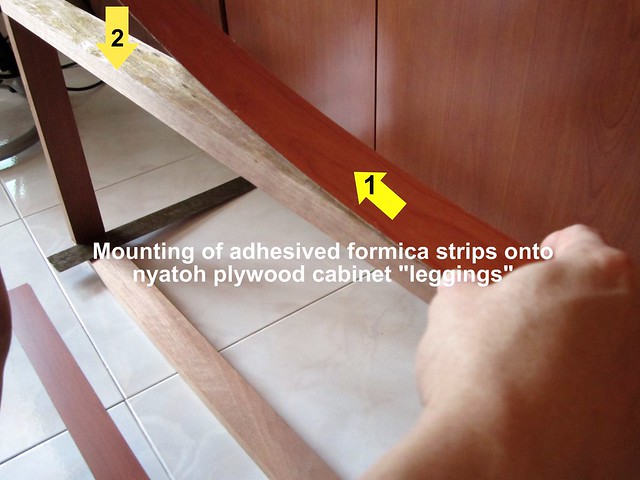
I had tried to illustrate how the formica is mounted by
labelling the photograph with yellow arrows.
One end of the formica strip with a numerical digit 1 on the yellow
arrow is held on one end of the nyatoh cabinet base & pasted onto it at my
hubby's extreme right hand side. Then,
he would gradually bring the formica down to the nyatoh adhesived surface,
working from the right hand side all the way to the left (see yellow arrow labelled
numerical digit 2).
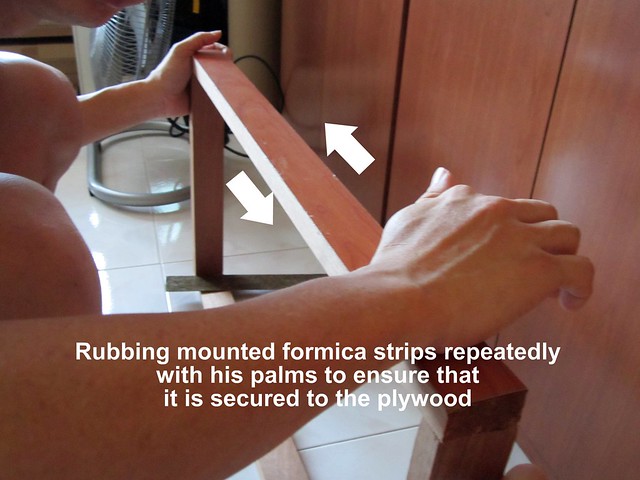
Once the formica is mounted onto the nyatoh surface in a
satisfactory position, my hubby then secured it by rubbing his palms along the
nyatoh cabinet base as shown in the photograph below:
Outcome photographed:
[photographs on finished product & having cabinets
mounted on individually - pending]
Accidentally come across your blog. OMG, you hubby is quite persistent to DIY. That is good as Sinkies had become too soft, just pay everything to get others to do the job.
ReplyDeleteFYI in future you need to get cut timber, go to these shop mentioned in renotalk: http://www.renotalk.com/forum/topic/20687-timber-shop-at-jurong-east/
http://www.renotalk.com/forum/topic/17080-where-to-buy-woods-timber-planks-plywoods-laminated-sheets/
Though the posts were old, many of the shops mentioned are still around.