This is a minor renovation assignment that was conducted at our flat in the middle of last year (2011) and is uploaded on my new blog recently.
We hope that all readers & new home owners or home owners-to-be would find this review useful!
Scenario:
When we first bought the flat 10 years ago, we felt that it was a marvelous concept that the previous owners brought down the wall between the MBR & the common room next door.
As such, we bought over a flat where the MBR and the common room were amalgamated to form one super huge MBR.
However, after 10 years down the road, we had aged and there was also a paradigm shift in our mentality.
We felt that it was so silly & impractical of us to have bought such a flat. We paid tonnes of $ for a 5-room flat and only to be saddled with just 2 bedrooms (excluding a studyroom which had tempered glass sliding doors & couldn't be considered as a bedroom in proper). We might as well have bought a 3-room flat instead during our younger days as a newly wed couple! :bangwall:
Many who had were such buyers like us, had difficulty selling off flats with such layouts eventually. So we had decided to put back both rooms so that they could be used independent of each other.
Interviewing contractors & IDs:
We had spoken to several IDs and realised in no time that some of them do not take up such assignments because we did not require any interior designing or the job was not significant enough to beef up their profit margins.
And that all we required was just structural alteration works, which left out the presence of an ID in our equation.
So we figured out that the best bet is to approach the contractors directly and we interviewed more than 20, including those who were highly recommended over RT forum.
Finalising our selection of a cement specialist/ contractor:
Finally, we shortlisted a cement work specialist (Ah Cheong) who had been introduced to us by our network of friends.
He specialises in demolishing of walls, erection of walls, tiling works, plastering, etc i.e. any renovation works that involves cement.
Both his tiler and himself visited us sometime towards the last few months of last year - if I didn't recall wrongly, it was in October 2010. He was unable to proceed in taking on any new assignments as his hands were so full that the earliest we could get into the queue was after the Chinese New Year period in year 2011!
He had addressed ALL our concerns and had also mentioned the following which we weren't aware of:
a) the demolishing would cause the existing tiling and skirting to crack because of the impact of knocking.
b) measurements would be taken up to protect our flooring during the renovation works & to minimise tiling cracks.
c) red bricks are not allowed because our prefabricated flat would be unable to withstand the weight of having red bricks being piled ontop of hollow block walls. We were shocked because we had the idea that HDB flats were built of red bricks but he had mentioned that the exterior is but not the interior, which are built of hollow blocks, most probabbly the 2.5" type.
He gave us an option of using hollow blocks with either 2.5" or 4" thickness. We chose 4" for supposedly better accoustic properties i.e. privacy in blocking out of noise between the 2 bedrooms.
A quotation was emailed to us on a separate ocassion after he had worked out details of our assignment, which included an extension of cement platforms in our kitchen. It will cater to the DIY installation of our IKEA kitchen cabinets later on.
In view of other errands in the flat which had to be executed before the renovation e.g. fengshui audit, termination of telephone points, rewiring in both bedrooms, etc, there were delays in engaging him.
By the time we tried to get hold of him, we were almost feeling disappointed because his work schedule was so packed that... we were almost left out of the queue :( Not his fault because his business was so good that we could see from his appearance that he was overworked & totally worn out.
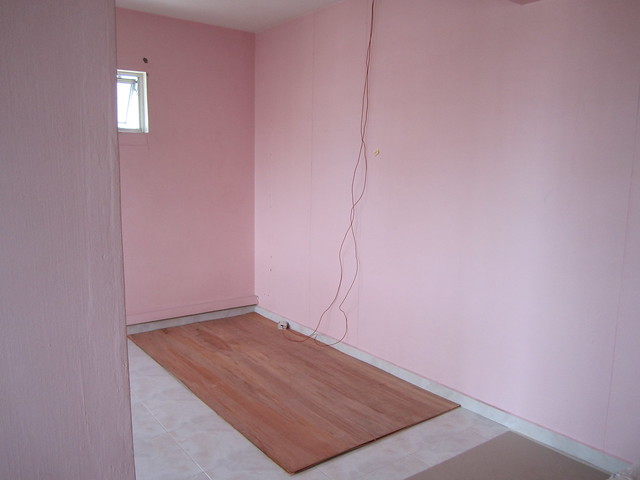
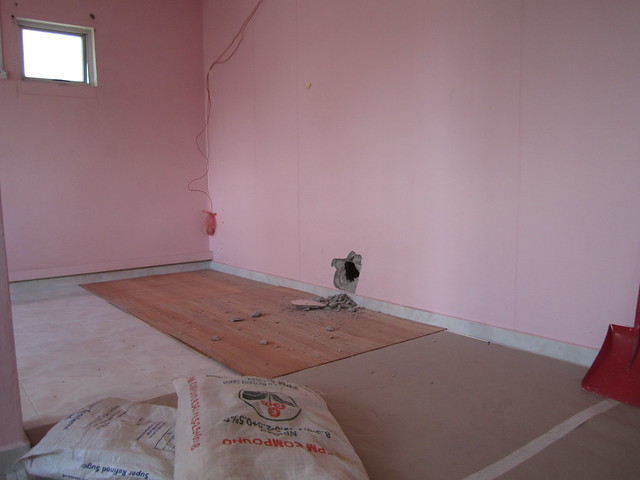
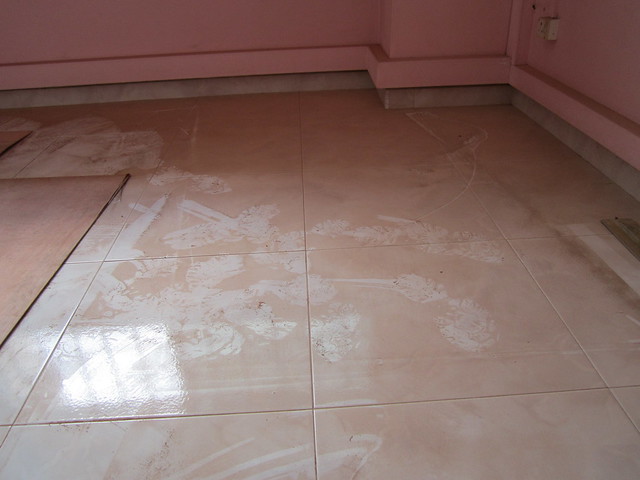
MBR : Its amalgamated appearance, i.e. before reno
This is an awful photograph of a section of the super-huge MBR before its reinstatement to its original HDB layout - it's too huge to be captured in the entire photograph:
The photo was taken in the afternoon and with its eastern facing, the lighting wasn't sufficient during that hour of the day; so it looked awful in the photo. Even the beautiful flooring had a "dirty" look.
So for those of you out there who had beautifully renovated designer homes, I could understand if u had a jaw breaking experience after looking at my threads with such a photograph! :jawdrop:
hehehehehe :P
Obtaining the approval of the HDB permit
The approval for HDB permit for this minor renovation was delayed too because our contractor, Ah Cheong assumed that the approval would be granted within 3 working days so he submitted on a Tuesday the week before the desired week for renovation.
The renovation was scheduled to take place on the following Monday (in April 2011) but we were shocked when he told us that the permit hasn't been granted yet.
Ah Cheong wanted to ferry us down to HDB branch office but I called the HDB branch office at about 9.15 AM to find out the status. And the technical officer had gone through the stack of mailers, but there were no traces of approval for our HDB permit yet.
He had assured us that it shouldn't be an issue because the HDB Architect required time to do the necessary before approving; he also promised us that he would contact me once he received the approval.
And it was really nice of him to keep track of the status for us. He called us up on the very same day in the afternoon at about 3.30pm to inform us that the approval had been granted and that the letter to us owners would be on its way out to the post office.
Getting ready for the BIG day :
- Laying Protection over our existing tiling; and
- Uploading Raw Materials
While we were waiting for the HDB approval to be granted on that Monday, whereby the reno was supposed to kickstart on but didn't materialise, Ah Cheong wasted no time in sending down his staff, whom we nicknamed "Ah-Bui" (becox he was really tall & plump but very young & hardworking) and another foreign worker to lay the ground work for the BIG day - which was to take place the following morning (after the approval was given on that very same afternoon).
But both my hubby & myself were genuinely fond of him (we have many nephews of his age) because he is a very quiet worker who goes about getting things done without uttering a word. Quiet, stable and systematic was how we would describe him; and we prefer quiet, diligent workers to those talkative, lazy bones.
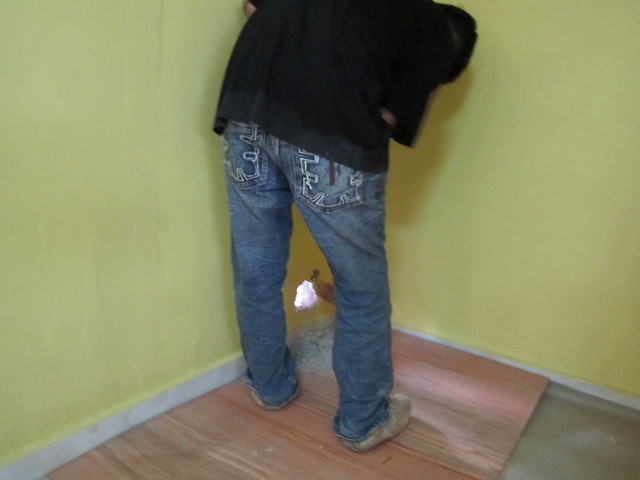
That's a photo of "Ah Bui" :
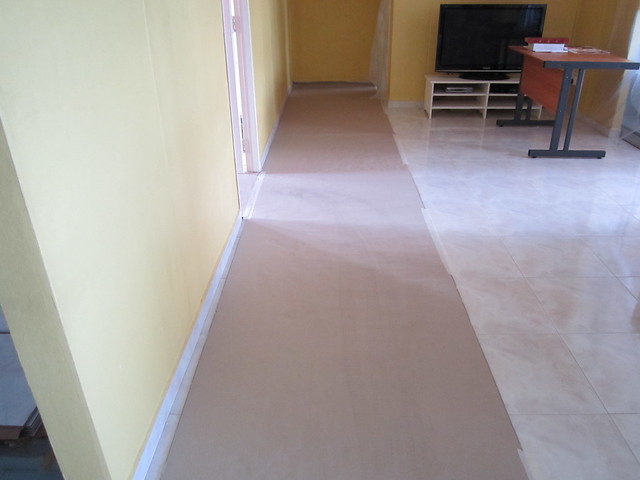
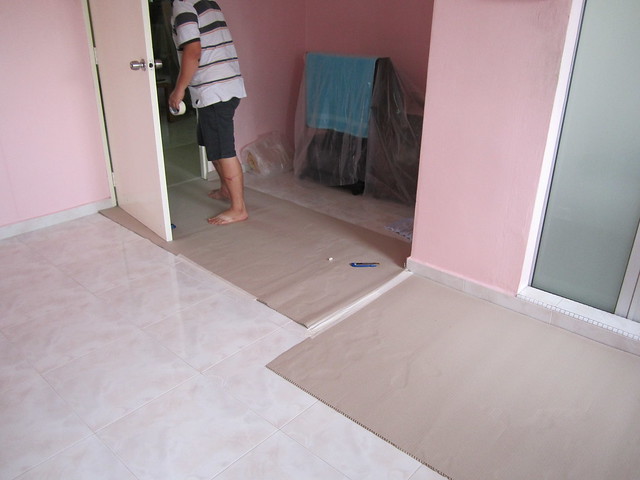
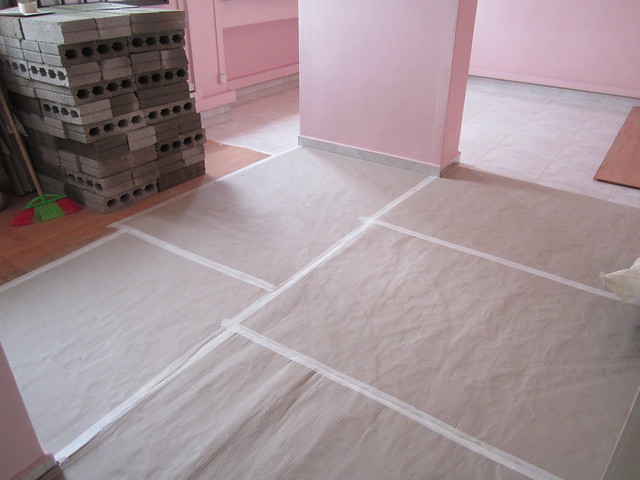
Corrugated paper (brand new) of a certain thickness had been laid, starting from the groove of our door step, all the way into our bedrooms. It was also extended like a red carpet that ran from the entrance all the way to the passage way where the wall is to be demolished to recreate a door entrance to the new bedroom (which used to be a common room next to the MBR from HDB's original floor plan).
Photo of a roll of corrugated paper:
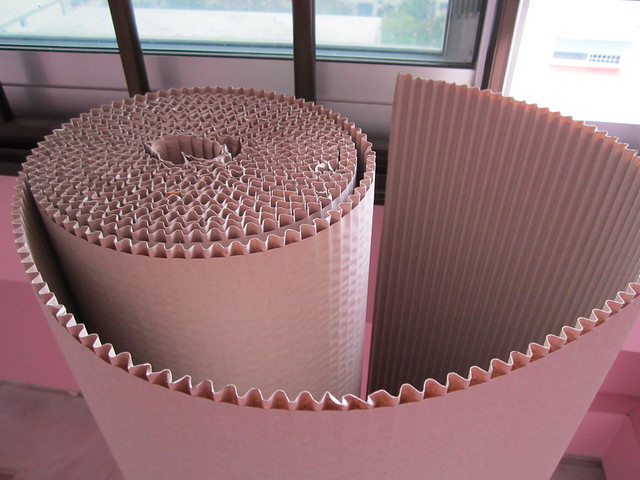
Photo of one of the foreign workers putting the corrugated paper in place at the entrance of our MBR:
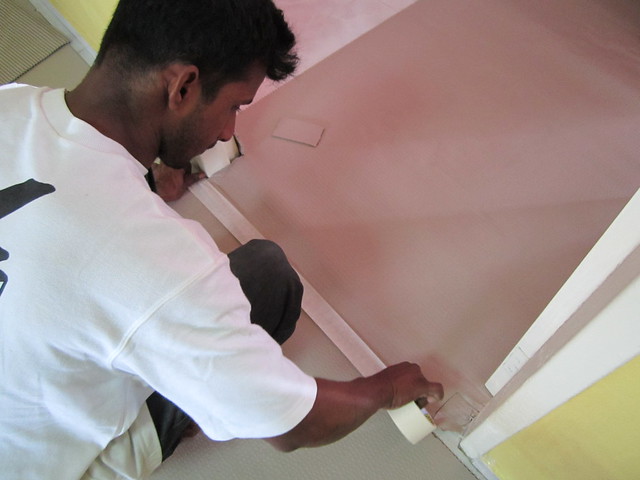
Photo of a long carpet of corrugated paper taken from outside out kitchen entrance
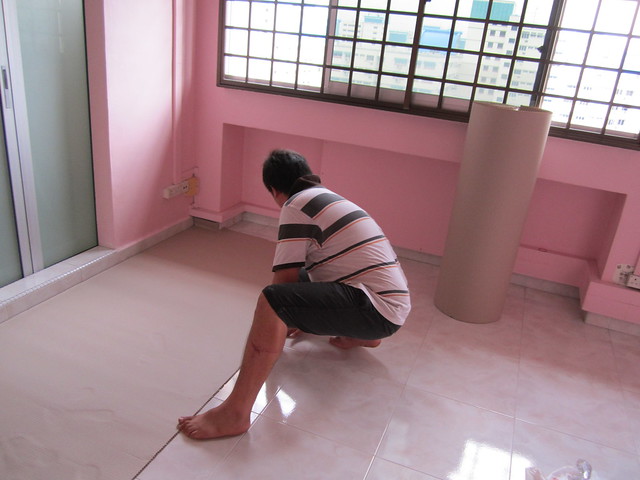
Photos of "Ah Bui" managing the taping of corrugated paper inside our MBR:
Getting ready for the BIG day :
- Laying Protection over our existing tiling; and
- Uploading Raw Materials
Now you can see why we call him "Ah Bui" just by
looking at this photo
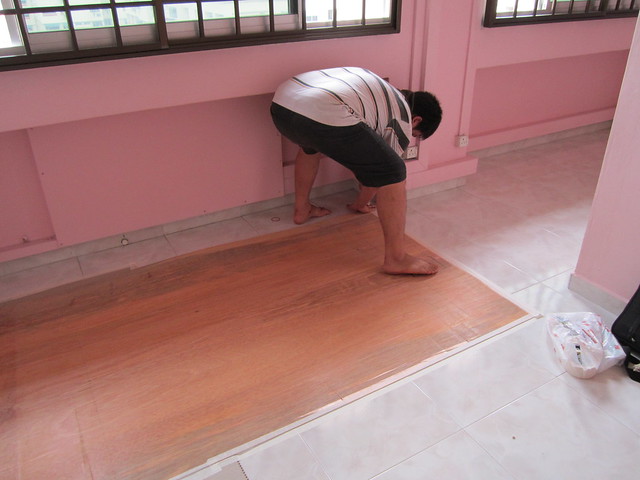
And relatively thin sheets of wooden boards (brand
new) were brought in and placed at the locations where cement mixture is to be
prepared and where the demolishing would take place.
"Ah Bui" taping the wooden board to the MBR's
floor:
Placing the wooden board where the debris would accumulate
when demolishing of part of the wall takes place the following day:
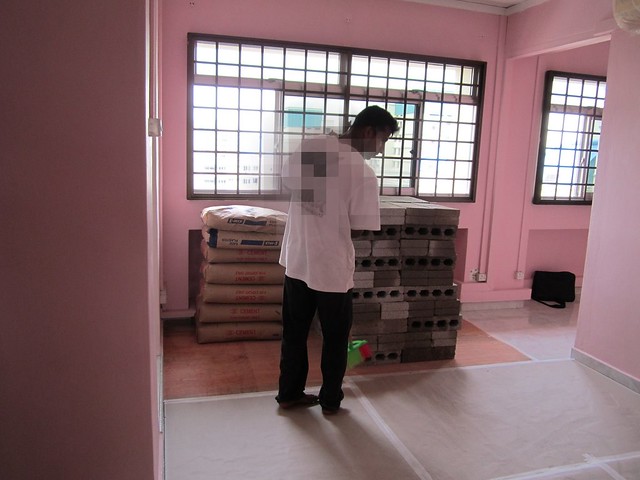
Then, they started bringing in the raw materials &
equipment; which could be seen in the photos uploaded as below.
4" thick hollow blocks, sacks of cement, plasters,
sand, etc.
Uploading the hollow blocks inside our MBR:
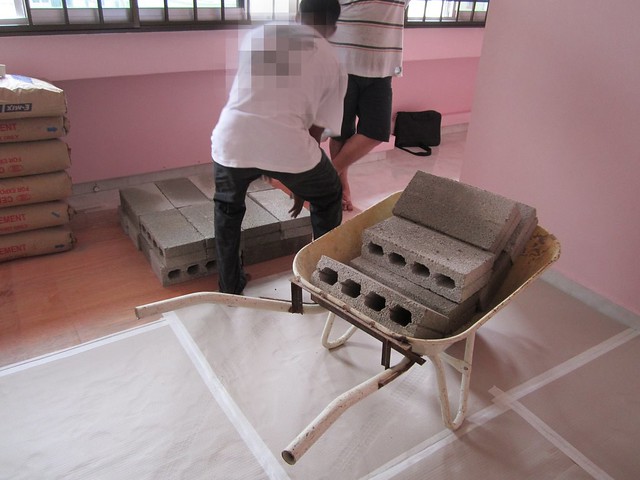
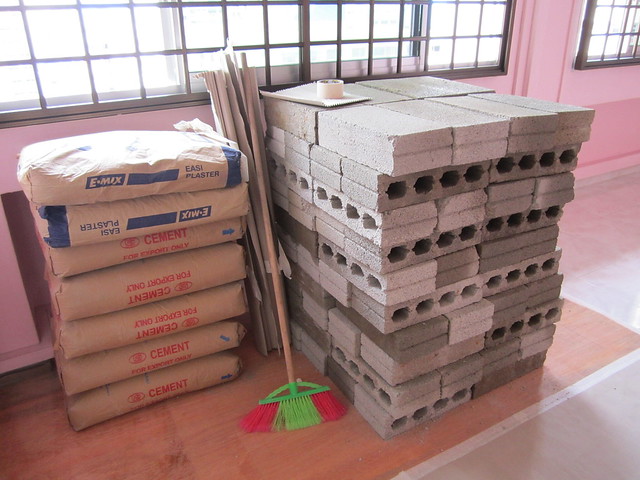
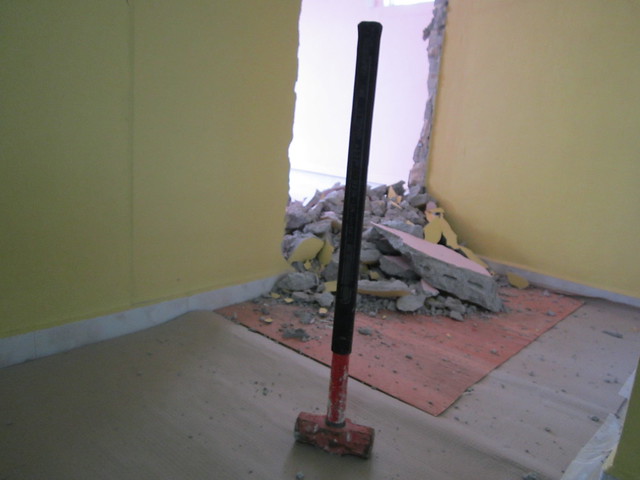
Photo of gunny sacks for containing debris, huge red spade
and a red hammer weighing tonnes (for demolishing the wall to restore entrance
to a door):
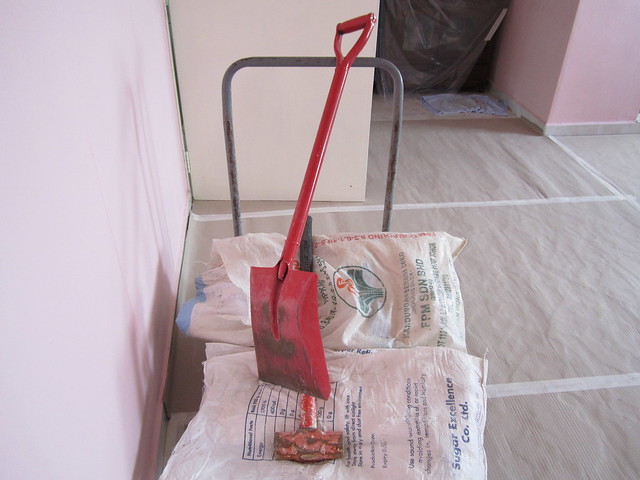
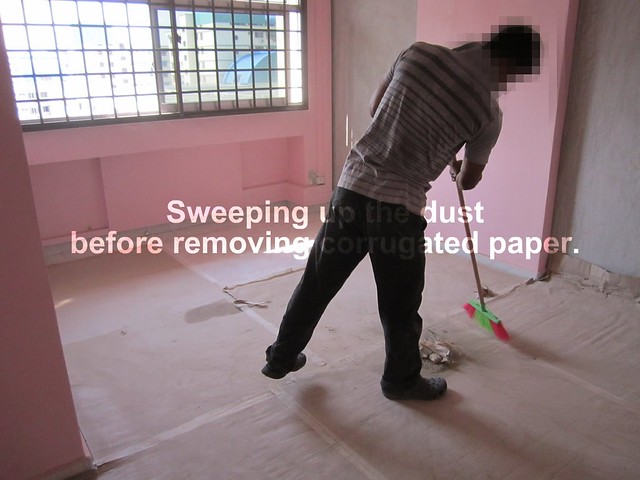
Photo of the hardworking foreign worker sweeping the
corrugated carpet after uploading all the materials in our MBR:
All neat & fully equipped for the BIG DAY the next
day! :horse:

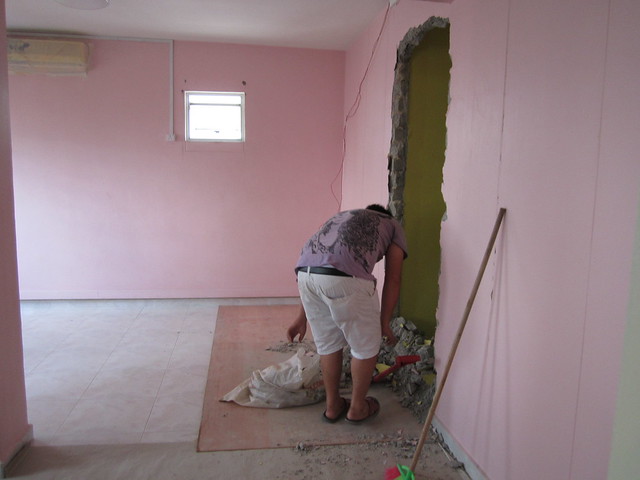
The arrival of the BIG DAY!
DAY 1
Our contractor, Ah Cheong, rushed over from another on-going
project to our flat in the morning and pasted the HDB renovation permit outside
our flat.
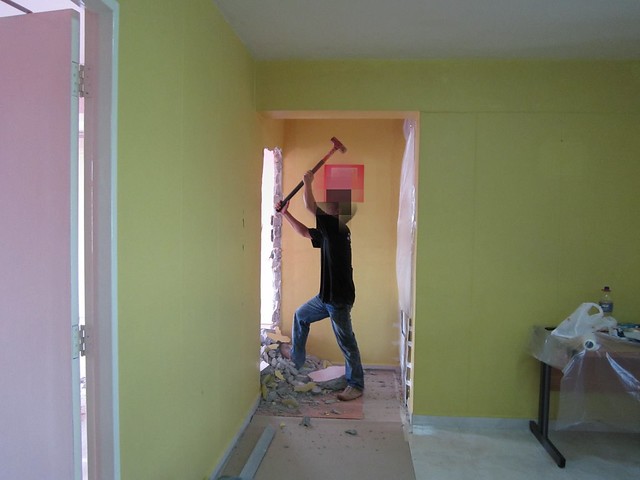
Without further delay, he started demolishing the wall with
the red hammer that I couldn't even lift up!
The noise was deafening by our standards. We stood at a distance while he started
knocking just above the skirting.
He was poised as if he was playing golf, but what a
dangerously heavy "golf" club he was using!
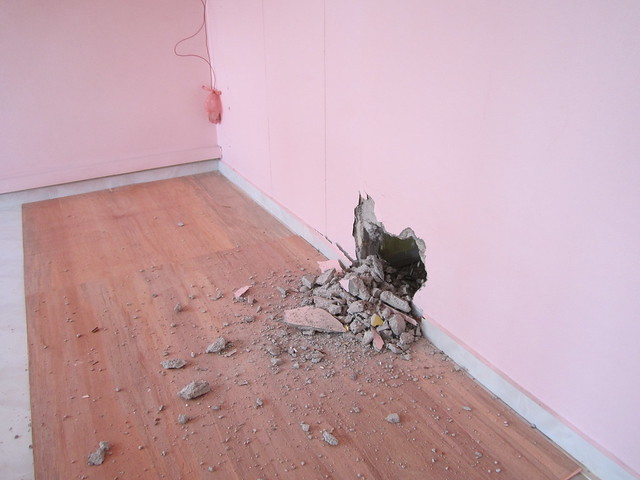
And soon, a small hole was seen as the debris started
falling onto the wooden board that was laid on the floor inside the
common-room-to-be.
As he went on knocking the wall, the hole got bigger as more
debris accumulated on the ground which was protected by thin sheets of wooden
board.
The demolishing was conducted bottom up and he switched from
the golfing posture to a top-hacking gear as you could see in the photos below:
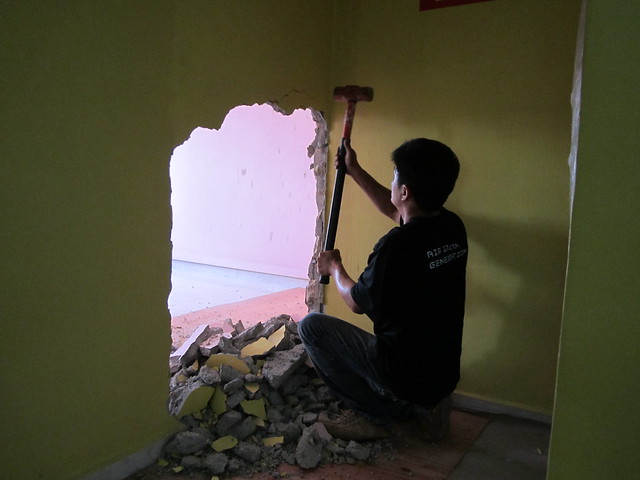
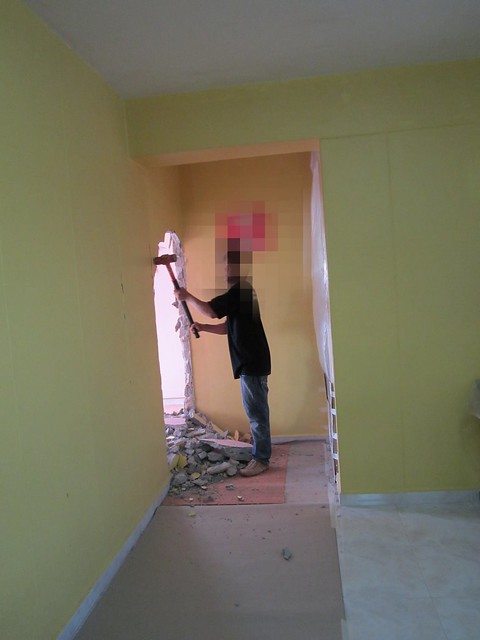
Hacking of wall continued...
A pile of debris autographed by the "killer"
hammer which I couldn't lift up, no matter how hard I tried to. I wondered how Ah Cheong managed to lift it
up!
Now, both my hubby & myself knew where Ah Cheong got his
gorgeous biceps from! he-he-he-he-he...
We observed Ah Cheong running to the common-room-to-be
through the MBR's door throughout the demolishing exercise.
Not sure what he was looking out for. But, we saw him gathering up the pile of
debris - as a buffer to more debris as the demolishing take place?? Some were thrown into the gunny sack but
some were stacked onto the existing pile of debris.
We were so overwhelmed by the amount of dust fogging the
living room that we could only guess what he was doing. And my hubby also reminded me to suppress my
talkative genes so that Ah Cheong could conserve his energy for demolishing the
wall.
Jux look at the amount of dust flying in our flat by the
time he completed the demolishing of the wall to create the entrance to our new
common-room-to-be!!! :(
I hope that the photo has clearly captured the foggy
atmosphere in our living room. It was a
real nightmare becox we're still staying in the flat while this is
happening!
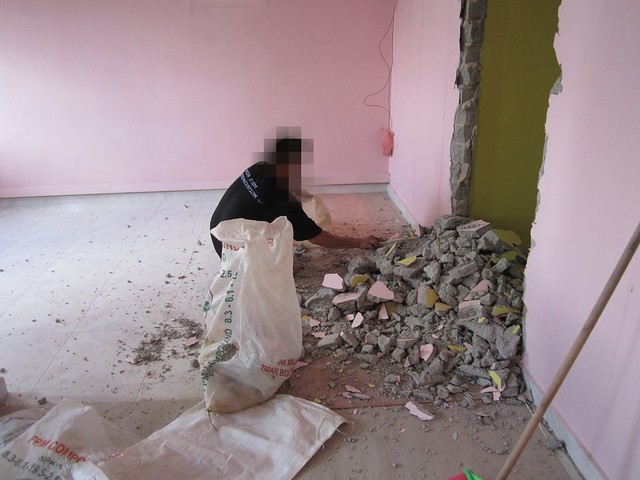
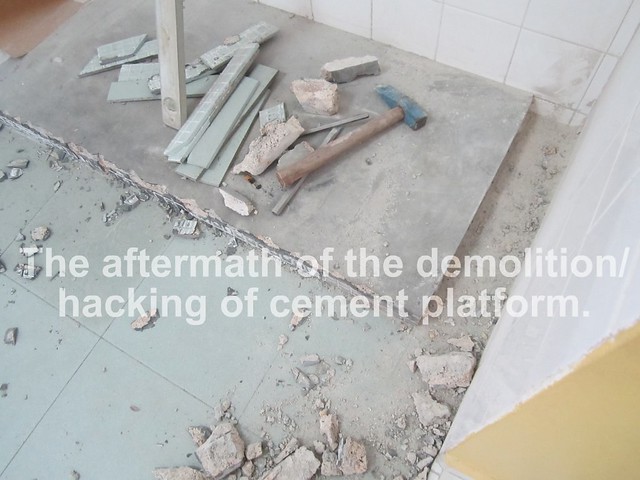
Removal of Debris
After the foggy episode with dust arising from the
demolishing of walls, there is another sand storm coming our way!
But before I move on to tell about more about they continued
to stir up a sand storm, Ah Cheong took the lead in sweeping up the debris that
flew off track from the huge pile of debris.
He then delegated the removal of debris to another foreign worker and
"Ah Bui".
Chiseling
I'll like to mention here that becox Ah Cheong had
demolished the wall by hitting at the area ABOVE the skirting running at the
bottom of the wall (adjacent to floor tiles), he had used a chisel & hammer
to carefully knock off the skirting lining surrounding the demolished work site,
that's if they had signs of cracks, etc.
You could see here in these photographs that he was also
making an effort to neaten the uneven flooring arising from the new
entrance. Raw of course with seasoned
cement that was buried under the fabricated wall for the past 15 years!
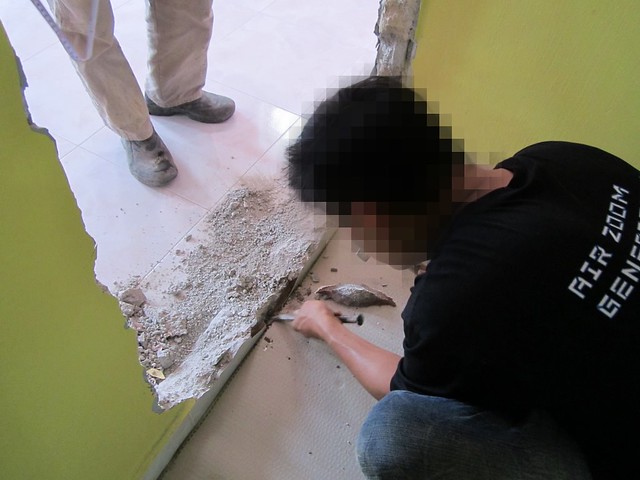
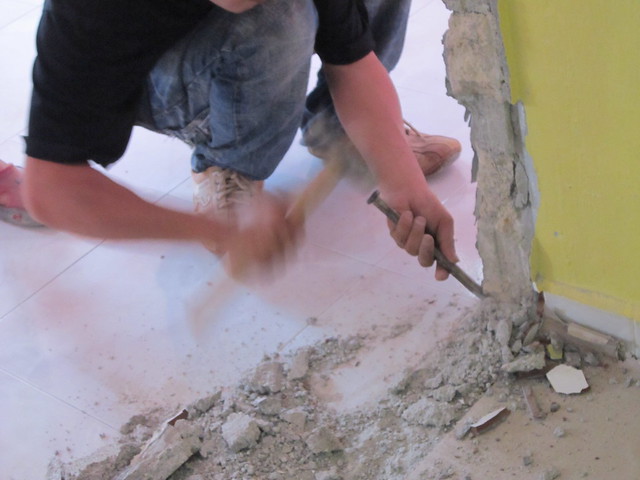
We were anticipating cracked tiles & damaged skirtings
but only the sides of flanking the new doorway had ceramic skirtings that
chipped off! The damage was minimal and
to us, negligible. What a pleasant
surprise!
Excellent demolishing work!
When we first met Ah Cheong for a site visit at our flat, he
did mention that it is not necessary for fabricated hollow block walls to be
sitting on the ground with existing ceramic tiles dug up.
However, we were "kia-su" (a hokkien slang for not
wanting to lose out) and we're not sure since when we acquired the idea that
ceramic tiles were slippery and the wall wouldn't hold well. Likely to be through a couple of
construction firms who were building bungalows.
Even though Ah Cheong assured us that the wall wouldn't
collapse becox of its weight, we still wanted to create more friction on the
ground so that the walls would be built on a extra strong & stable
"foundation".
So we stuck on to our own idea and were billed for it of
course
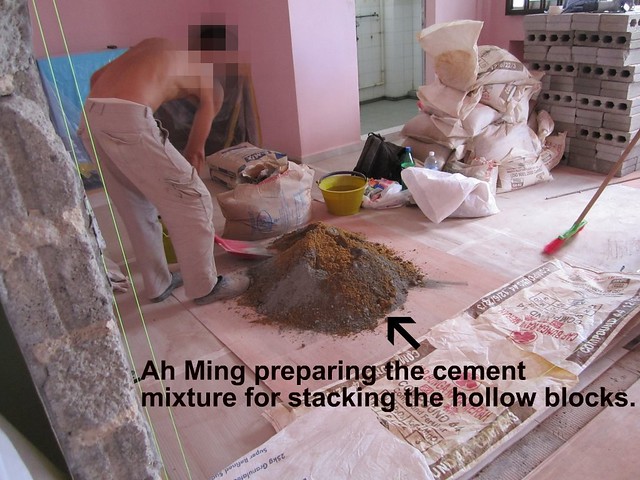
The worker who was given this assignment to cut out the
ceramic tiles and build the walls was Ah Ming.
He stepped into the picture while Ah Cheong was chiseling the rough
edges of the new doorway after the demolishing was completed.
And like Ah Cheong and "Ah-Bui", he took extra
care of our ceramic tiling and even our electrical switches.
Sand-STORM :
And with the adamant decision to have the tiles cut prior to
building the hollow block walls, a SAND STORM was inevitable! :(
Ah Ming flipped up one of the pieces of wooden board in our
new common room and used that as a make-shift door to block out as much dust
which he warned us, would be terrible while he cuts out sections of the ceramic
tiles where the new wall would be built on.

Look at poor Ah Ming slogging the ceramic tiles out!
During the lunch break, we heard him forcing out the dust
really hard from his throat - no phlgem was heard but my hubby said that he was
forcing out the dust. And we didn't
blame him for cleaning his nose at the emergency staircase after he ate his
lunch.
Photo shows the aftermath of cutting the ceramic tiles: Just look @ the dust!!
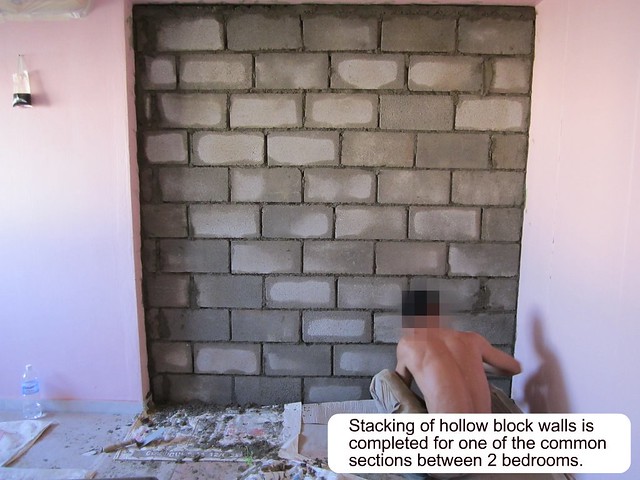
Fabricating of (hollow-block) Walls
After Ah Ming extracted sections of the existing ceramic
tiles, we took pictures of his beautiful handiwork and if you refer to the
photographs below, you would notice that he had put up green strings held on by
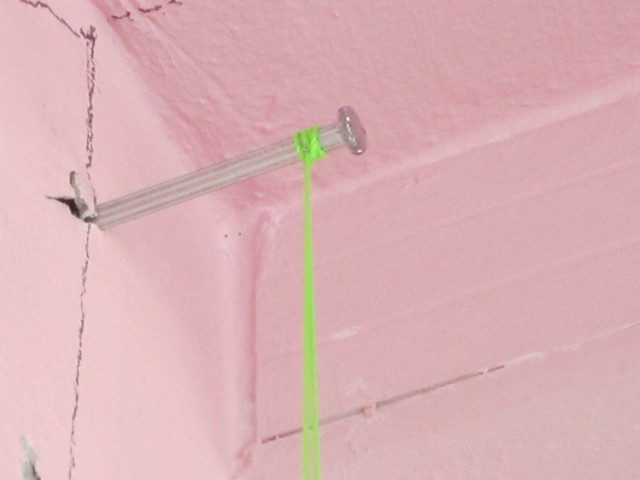
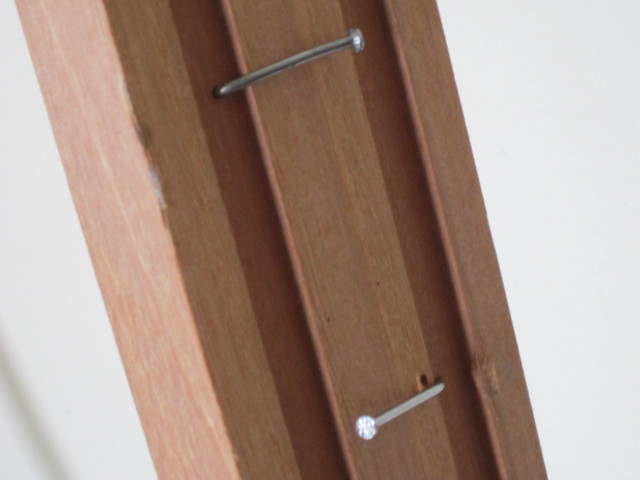
nails at all 4 corners where the new wall would be constructed at.

Ah Ming explained that it was to ensure that the walls are
upright and straight while he built them up.
One of the nails embedded at the top of a wall below the
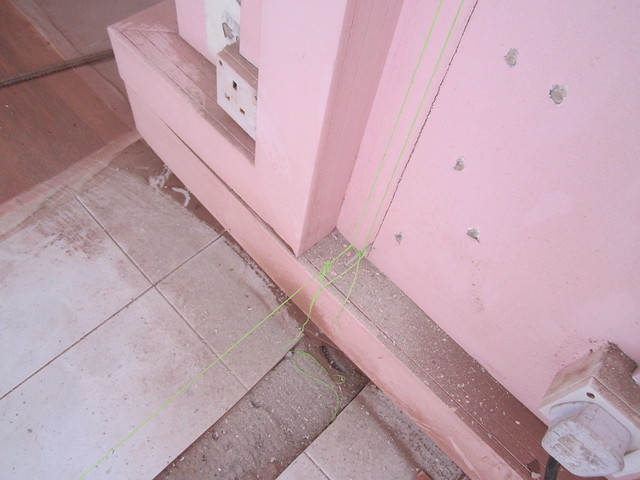
beam, holding on to the green thread:
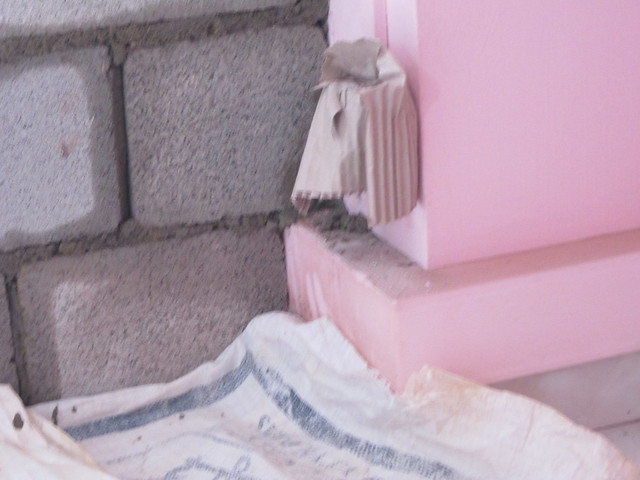
He had also been very considerate in wrapping our power
points with corrugated paper to prevent cement from staining or choking them
up.
After setting up the green strings that are held in place by
nails on the sides of the walls, Ah Ming started to construct new walls with
the 4" hollow blocks.

Hollow walls getting stacked up...
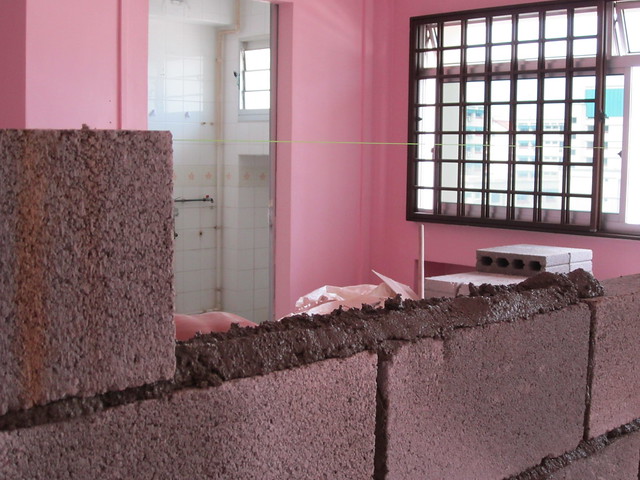
Photo shows one of the walls being fully stacked up using cement
and 4" Hollow blocks:
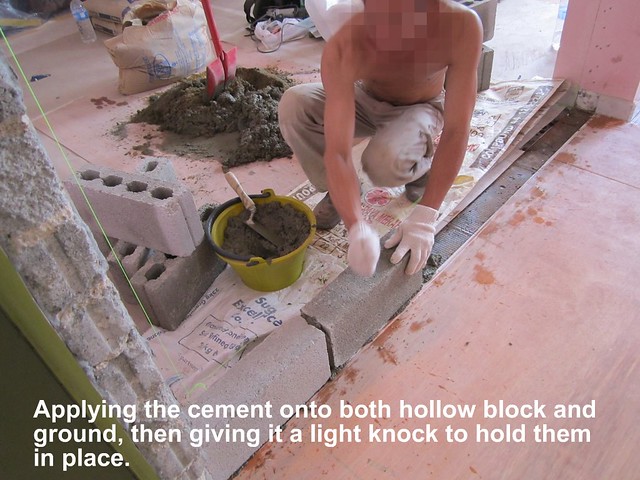
Once the hollow block walls are completely stacked up with
cement, Ah Ming started to apply the first coat of cement as shown in the photo
below:
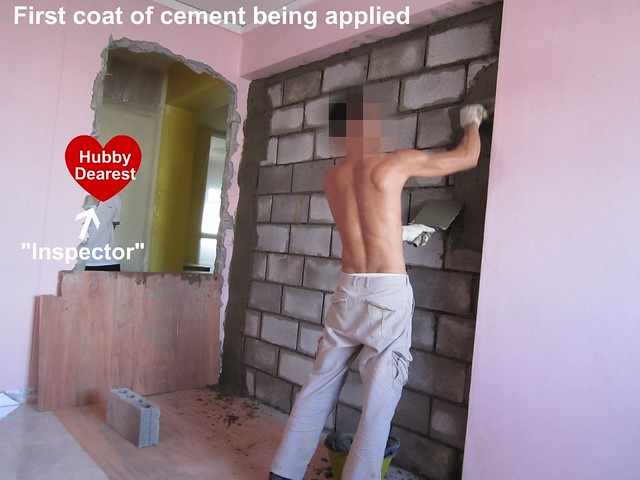
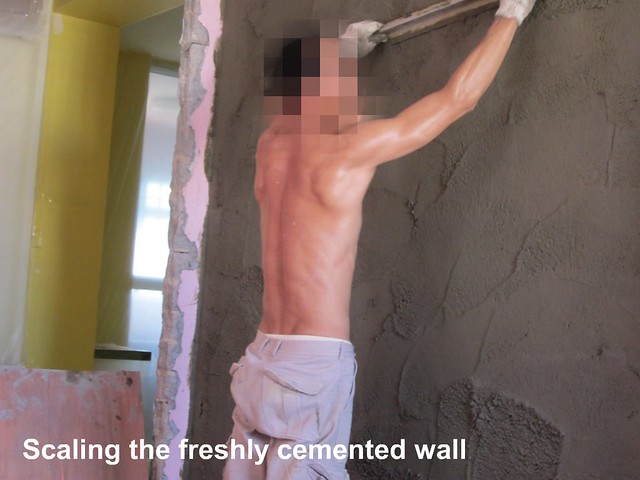
After a first layer of cement had been applied very
generously, Ah Ming used an aluminium or wooden "stick" with a flat
base to scale down the cement.
We observed that as he did that, some of the impurities e.g.
small pepples started falling off, which left holes in the cemented walls.
Another coat of cement has been applied generously over the
first layer.
Those "holes" or "gaps" left by the
pepples or stones which were taken out during the fist scaling process were
also covered with this second layer of cement.
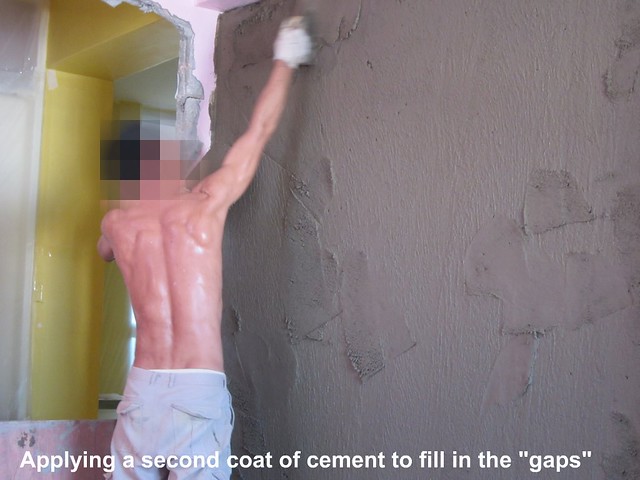
Then, Ah Ming repeated the scaling process to smoothen the
cemented wall.
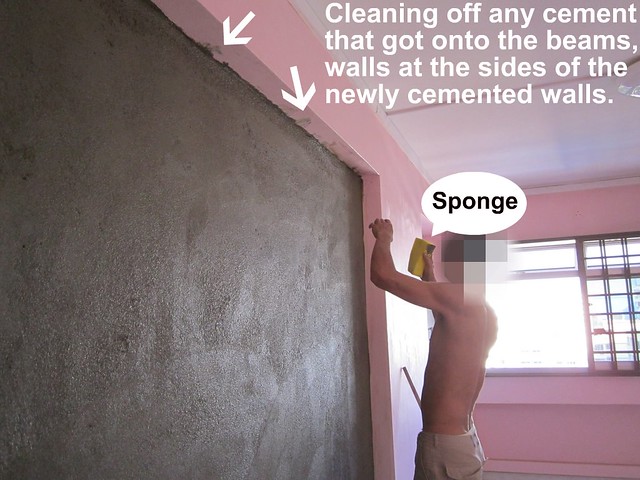
This scaling process is then followed by cleaning off any
cement staining the beams and existing wall with a damp sponge.
It was time for Ah Ming to knock off by the time he
completed applying 2 layers of cement on one side of the hollow blocked wall.
Take a look at the chaotic state of the MBR at the end of
the 1st day :
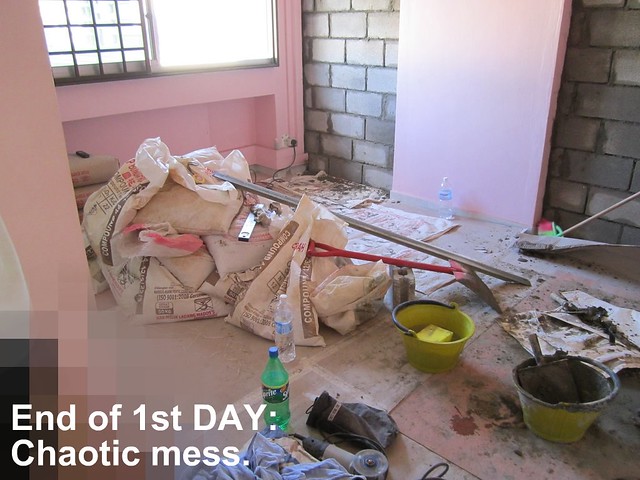
However, we were pleasantly surprised that Ah Ming had taken
the initiative to clean up the MBR.
We witnessed how tough his manual job was throughout the day
and told him that he need not clean up since reno work is still in progress.
However, he insisted on cleaning up the room before he
packed up and left.
He had explained to us that Ah Cheong & all the team
members would always make an effort to clean up "the mess" for owners
(before calling it a day) when they are living in while the renovation is
on-going.
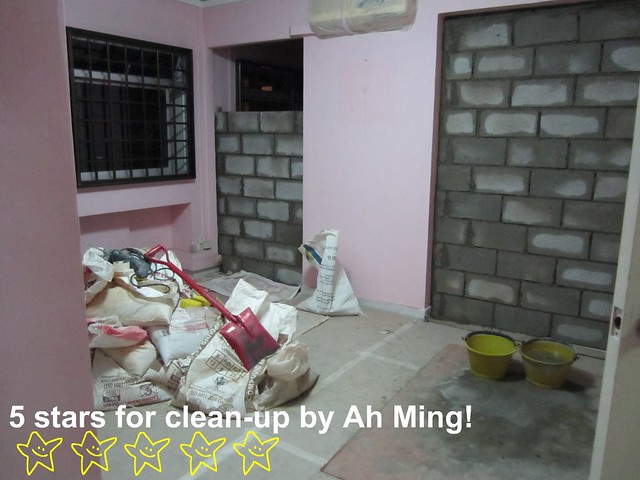
And just take a look at how neatly packed the MBR is after
he cleaned up the place! 5 stars for
him!
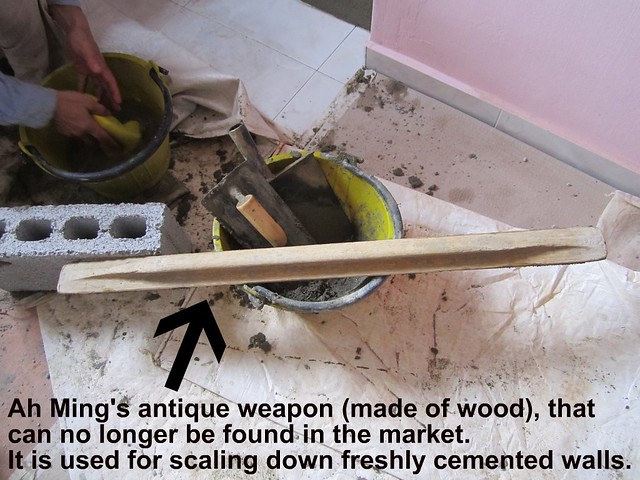
Post-script (DAY 1):
Ah Ming had 2 of these rods with a flat underbase for
scaling down freshly cemented walls.
One of which is made of wood and the other aluminium. He had explained to us that the wooden
version is no longer produced and cost alot more than that the aluminium
version.
However, nothing lasts foreover becox repeated scaling would
thing down the wood. So it is indeed a
precious antique to him. The aluminium
version could not be used forever too.
Both versions had lifespans.
DAY 2:
- Cementing hollow blocked walls (continuation)&
- Installation of (wooden) door frame
Ah Ming dropped in the following day (Day 2) at about 8.30AM
and continued stacking up the second wall with hollow blocks.
Then, we left him in the bedrooms to apply cement & do
scaling.
So there weren't as many wall-related photos to show for Day
2.
However, the wooden door frame for our newly created bedroom
had arrived.
And after lunch, he had dealt with the wooden frame by
hammering nails in a "zig-zag" fashion as shown in the photo below
prior to installation:
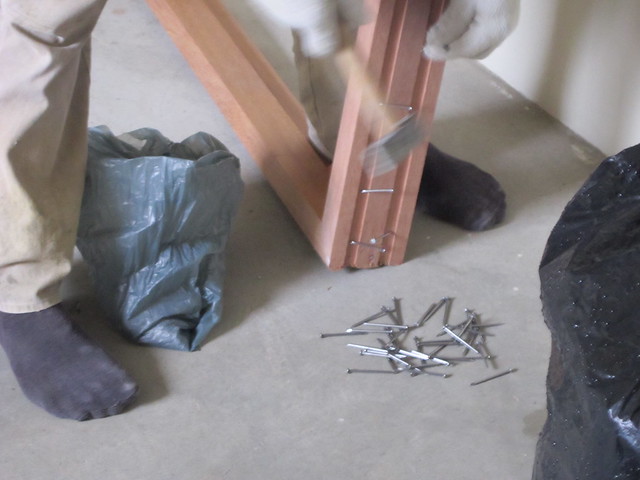
He said that this would ensure that the door frame is
strongly embedded into the cement. Have
a stronger grip onto the cement when applied on during the installation
process.
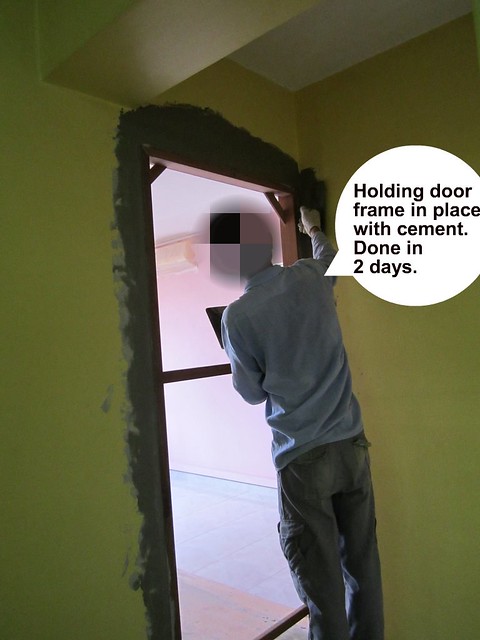
(I am so sorry that I had a loss of words to express this
process clearly. Found it tough to
describe the technical process.)
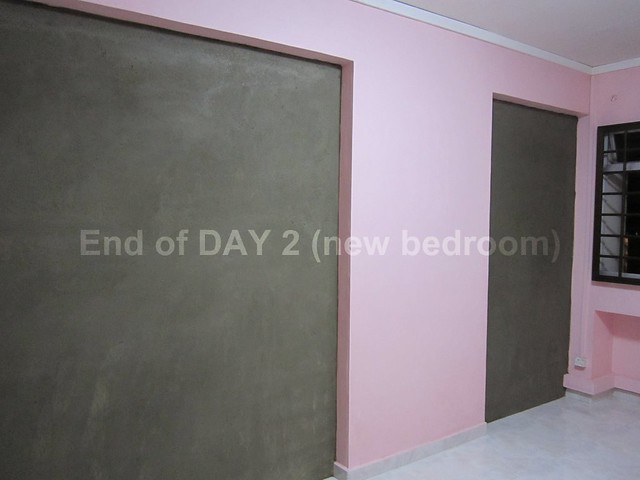
End of DAY 2...
Ah Ming told us that plastering would be done the following
day (DAY 3) because the walls would start cracking if they were applied on the
very same day as the first 2 layers of cement.
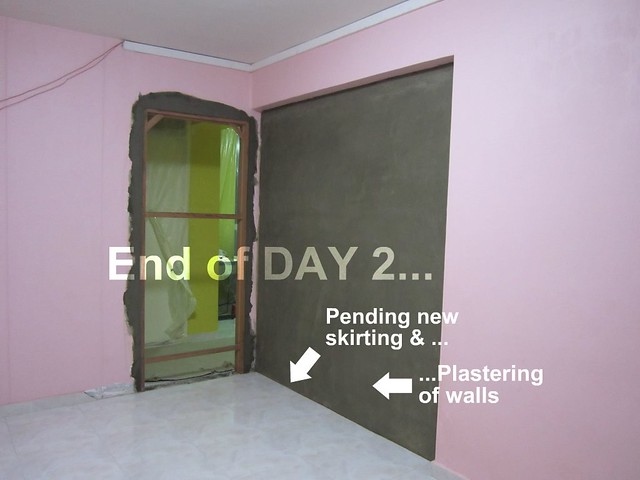
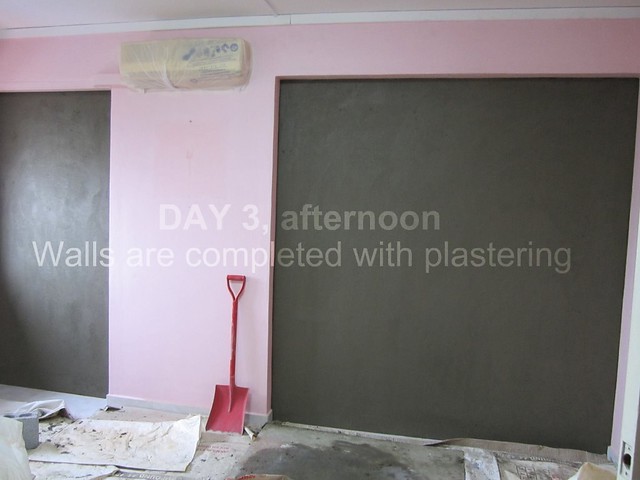
DAY 3:
- Plastering of walls
- Installation of Skirting
- Switching of doors
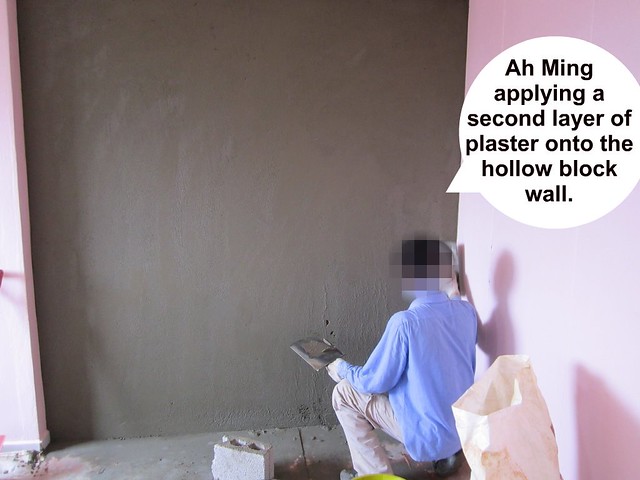
Plastering of walls
Ah Ming prepared the plaster and applied all over the newly
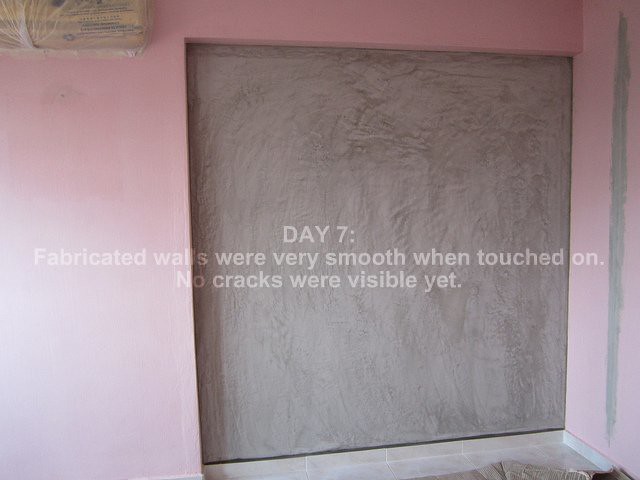
cemented walls as shown in the photo below.
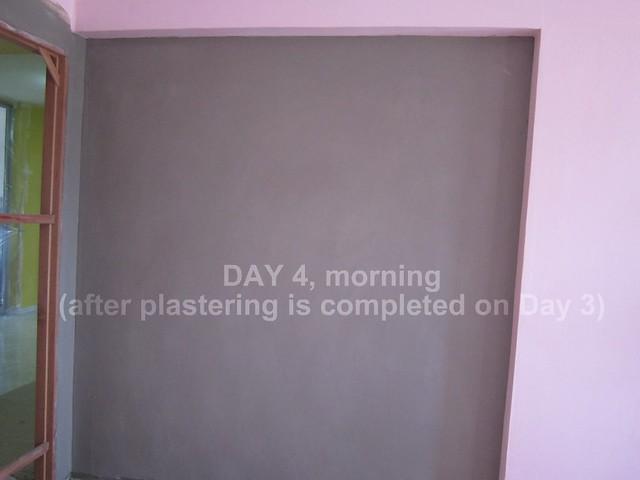
And how it looks like on DAY 4 (morning):
And DAY 7:
DAY 3 (continued):
Skirting & tiling
The tiling supervisor, Mr Loh & his worker Ah Keong came
by at about 10AM in the morning.
In fact, Mr Loh dropped by in the early evening on DAY 2
before we called it a day. He came to
inspect the area that required skirting & tiling; and also, the cement
platforms in our kitchen which required both extension breadth-wise &
hacking length-wise.
And before he went off on DAY 2, he left a bag of white
plaster & some accessories in our MBR along side with the other raw
materials which Ah Ming had been using for constructing the hollow blocked
walls and installing the door frame.
Photos below show these 2 existing cement platforms in our
kitchen bearing red markings made by Ah Cheong to highlight to Mr Loh on what
needs to be done.
These platforms are conventionally used to accomodate
kitchen cabinets and the extension is necessary in accomodating to our IKEA
kitchen cabinet, which my hubby would be installing on his own later on.
Upon his arrival on DAY 3, Mr Loh wasted no time in
demolishing inches off one of the cement platforms becox extra space is
required for installing a double-tracked kitchen door.
The amount of dust that was stirred up was terrible. It was a SNOW storm! And it's a pity that I didn't have the
chance to take a photo of Mr Loh being covered in white dust! I was told by my hubby that he emerged from
the kitchen covered in white powder!
We were told that they couldn't continue until the dust
settled so by the time I returned with their lunch, my hubby had installed a
heavy-duty fan in the kitchen to disperse the white fog.
This was how it looked like when the "fog" in our
kitchen was dispersed:
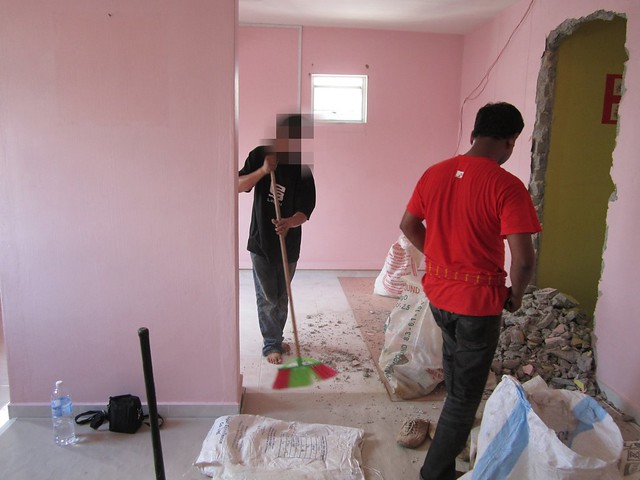
And Ah Keong sweeping up & tidying the rubble in our
kitchen before continuing with their assignment:
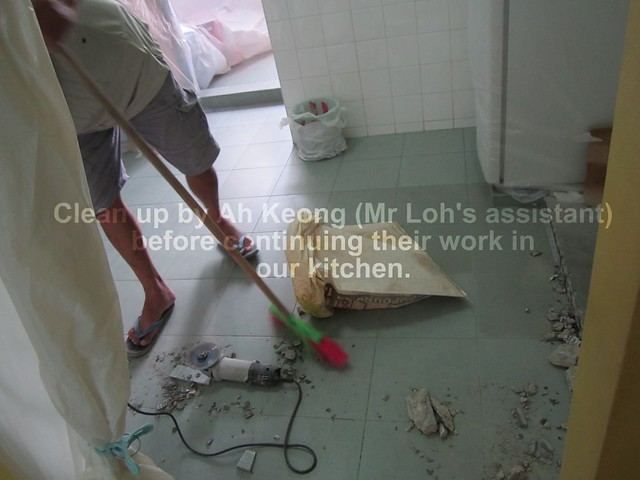
Photo shows Mr Loh taking off the skirting very carefully
from the existing cement platform (i.e. before the SNOW storm was done - forgot
to include this in my earlier thread):
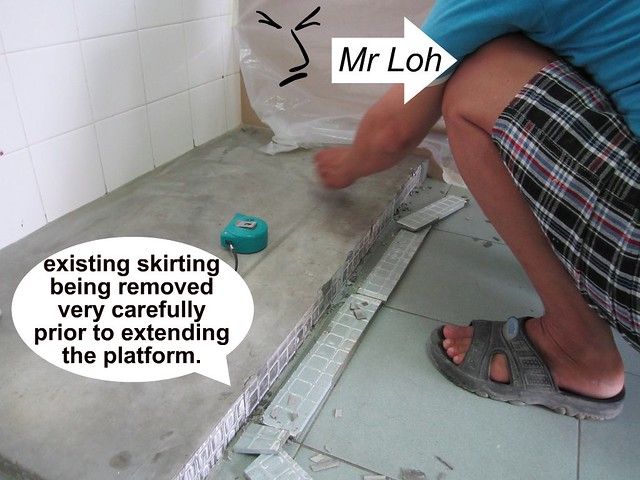
The samurai expression that was inserted into the photo was
a candid gesture; all in the name of having fun but it reminded me very much of
Mr Loh's facial expression. A man
with a sense of black humour. hehehehe.
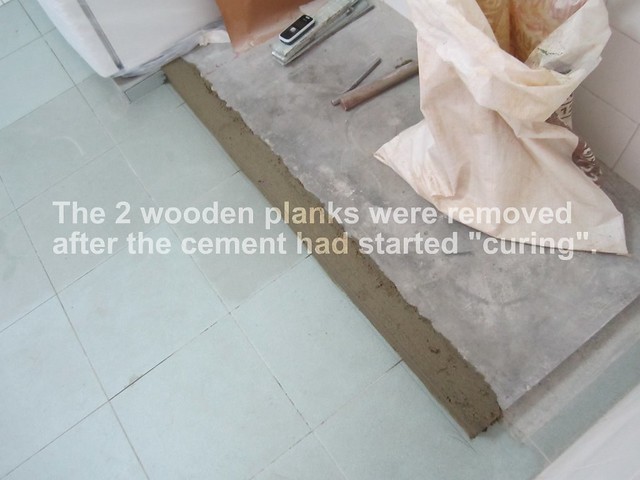
To be continued from where Ah Keong was seen sweeping up the
rubble in the last photo in my previous thread, he (Ah Keong) placed 2 wooden
planks or were they aluminium (?? not sure) adjacent to each other against the
newly modified platform and started filling the "gap" or
"slot" with cement.
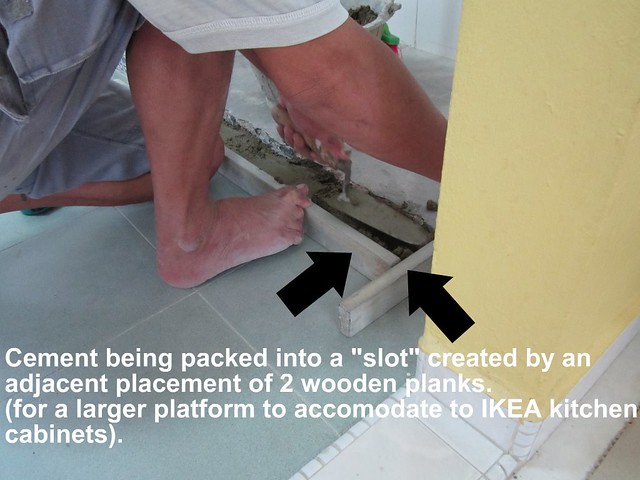
After the "slot" was fully packed with cement, the
2 wooden planks were removed as shown in the photo below:
We were lucky that the previous owners had left us plenty of
spare kitchen (bathroom) tiles given by HDB when they first bought the
flat. At least, they came into use for
this ocassion.
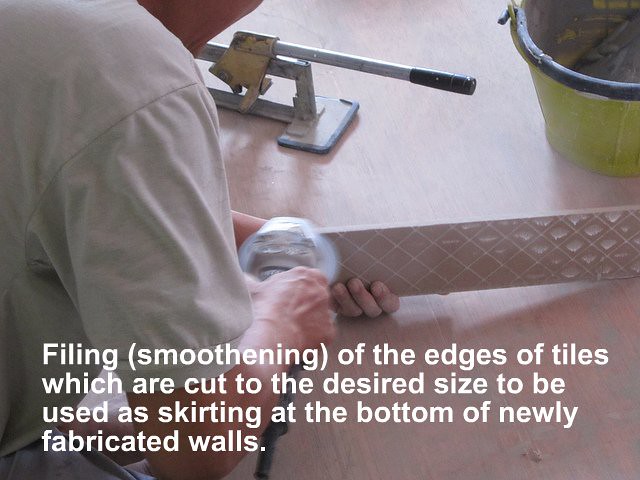
We had observed that Ah Keong had used a cutter to cut the
tile to a desired size (which in this case, is used as skirting lining the
edges of the newly extended cement platform).
An electrical gadget with a round blade as shown in the photo below was
used to "file" the edges of the tiles. Presumably to smoothen the edges. For a smooth finishing at the sides.

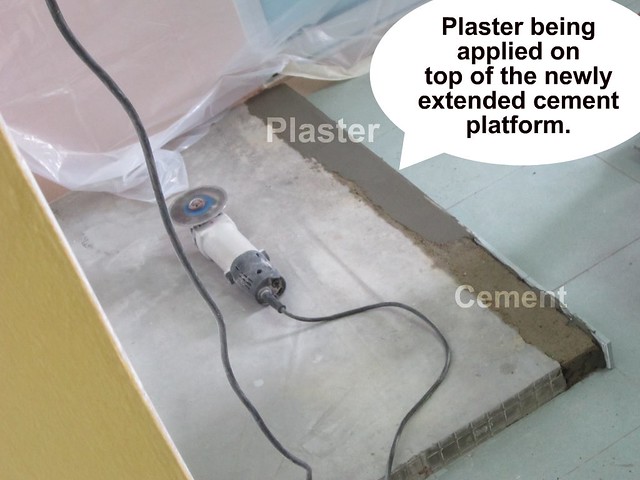
After sometime (cannot recall the exact duration), plaster
was being applied onto the top of the new cement blocks.
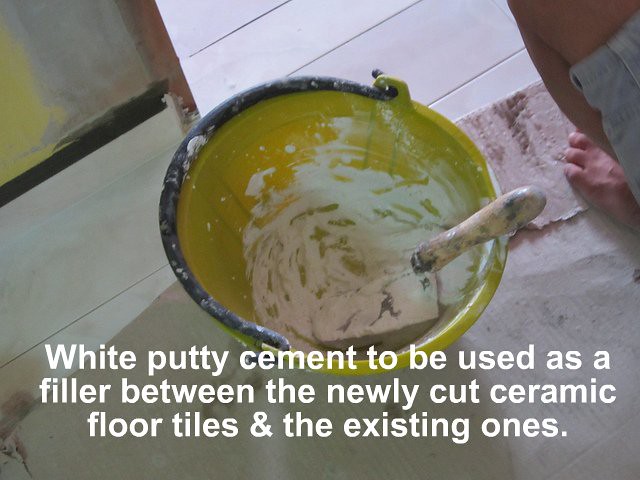
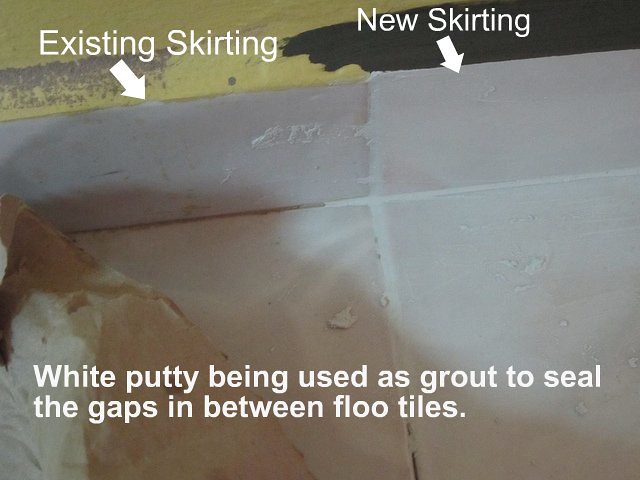
Grouting between the skirtings are also done as shown in
this photo:
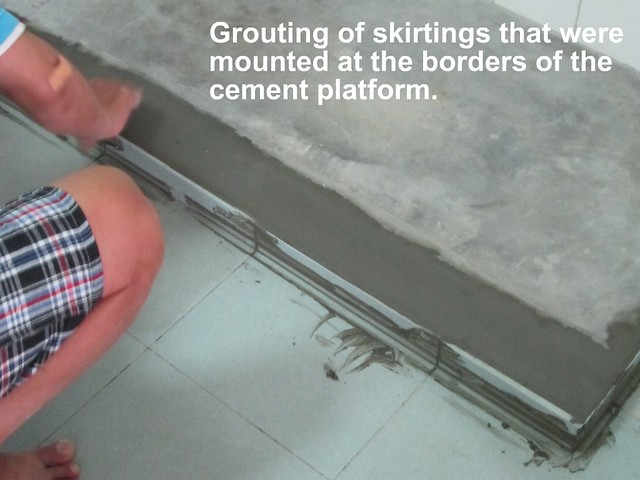
Then, Mr Loh used a damp sponge to clean up the excessive
cement lining our kitchen floor and parts of the skirtings.
Once the tiling & hacking works in our kitchen is
completed, the tiling team moved on to skirtings for our bedrooms.
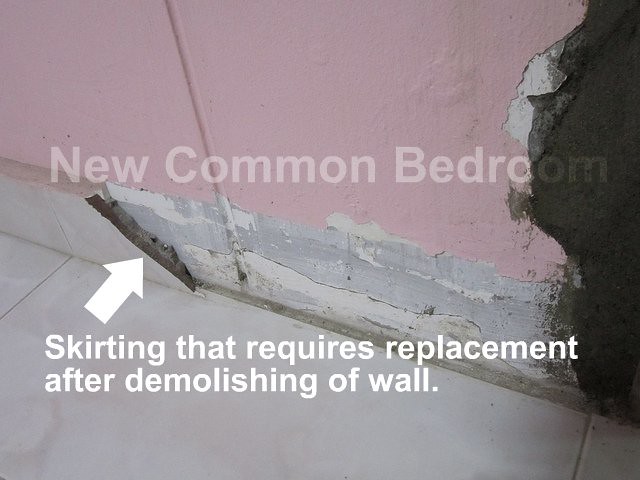
Photos show the skirtings that need to be replaced on both
sides of the door entrance, from the interior and exterior of the newly
restored common bedroom:
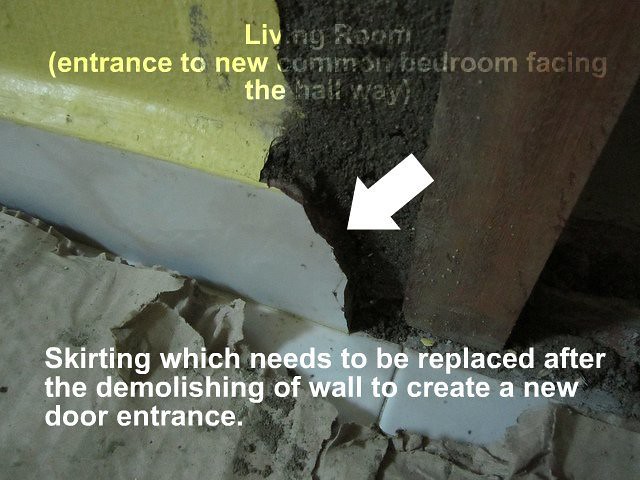
They would also need to replace the tiles at the doorway
after demolishing the walls.
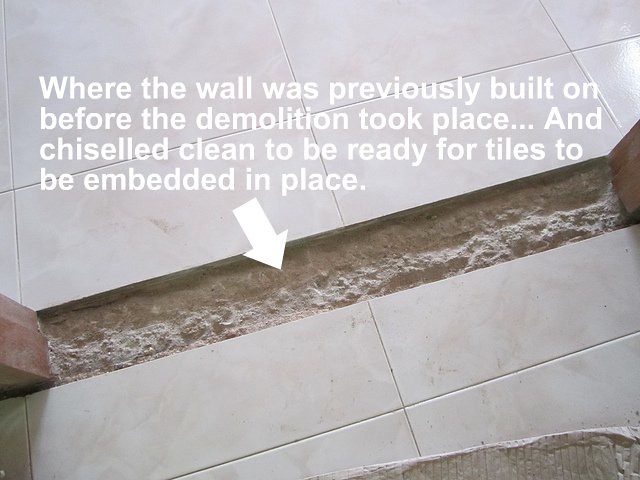
Photo shows a neatly chiselled gap between the existing
ceramic tiles where a wall used to sit on before Ah Cheong demolished it:

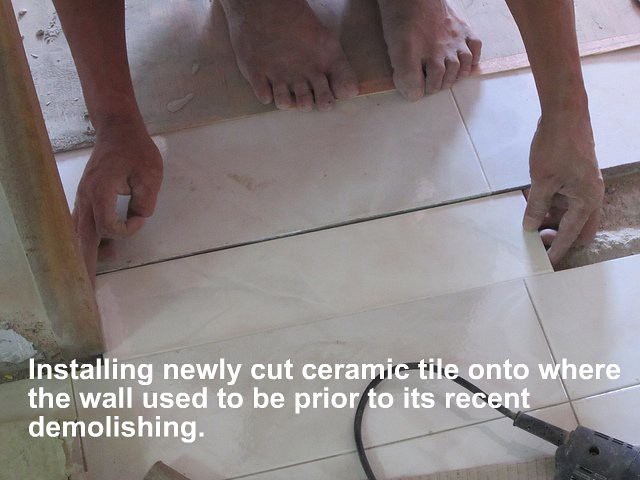
The final outcome of the tiling at the entrance of the newly
restored common bedroom as shown in the photo below:
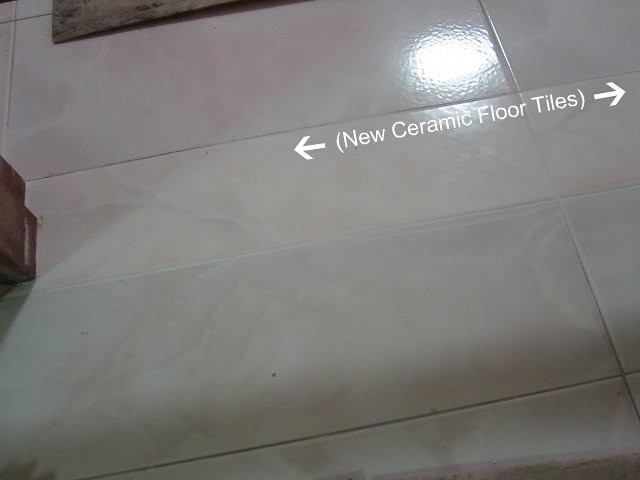
A similar looking ceramic tile was bought by us after
searching through with many tile shops.
The new tiles had a similar print to our existing tiles but it has a
cream-coloured base and a pinkish undertone to it.
However, we are pretty happy with the outcome because the difference
between the existing tiles and new tiles weren't as obvious unless visitors
peer at them very carefully.
Photos of new skirtings...
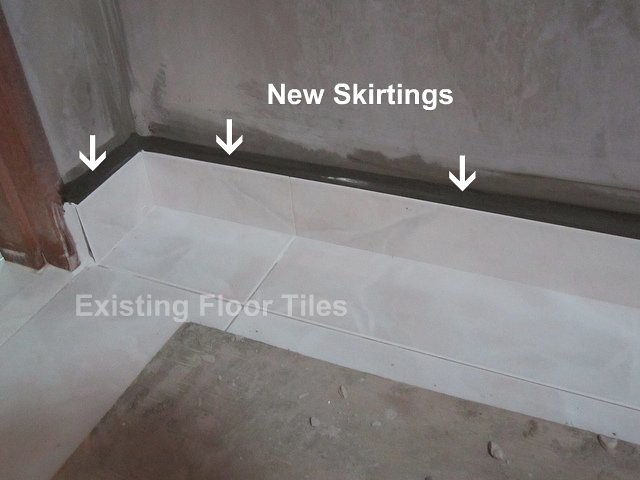
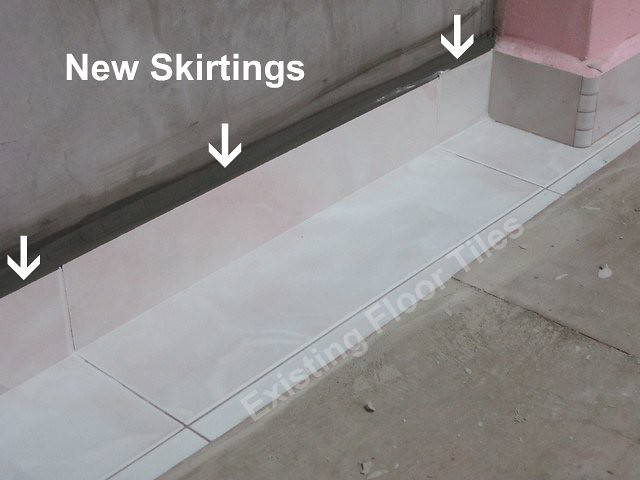
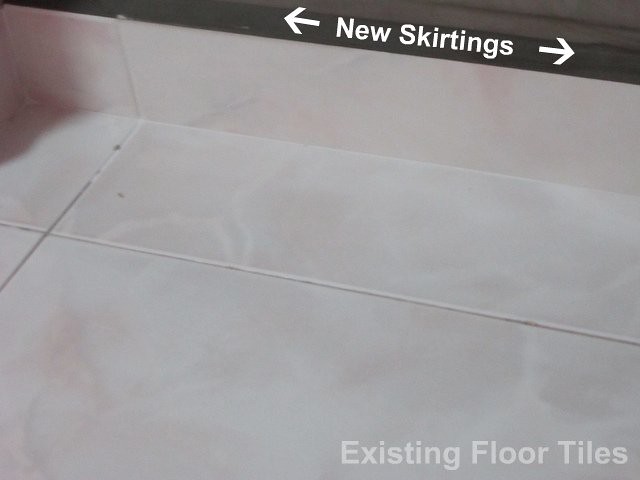
The contrast is quite minimal when the new tiles were used
as skirtings. Because Ah Cheong had
done a very good job in demolishing the wall, none of the existing floor tiles
require replacement apart from the skirtings that were flanking both sides of
the new door frame as seen in the first 2 photos under post #29 of this thread.
In fact, we were left with 3 pieces of spare tiles!
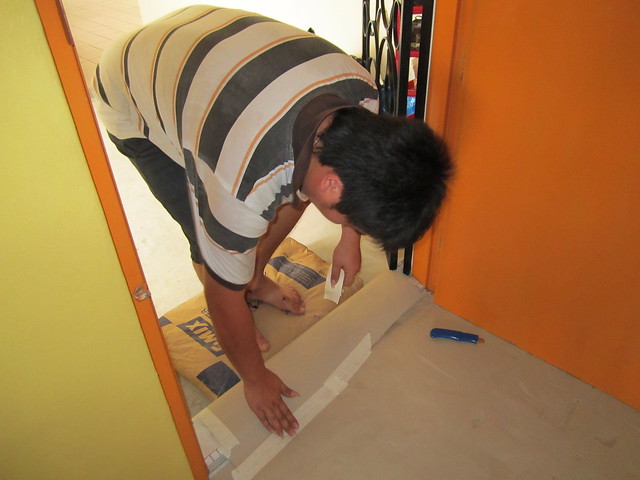
The door installer was called in at the last stage of Ah
Cheong's renovation at our home to dismantle an existing HDB door from one of
our common bedrooms and re-install it in the newly restored common bedroom.
This same door company who was supposed to send down an
installer, provided the door frame earlier on.
However, it was quite a pain making this door company have their
installers keep to their appointments when we required a switching of door.
Anyways, the door installer reinstalled the door for us and
since he did a decent job when he finally arrived, it is case closed but we
would avoid using this door company in the near future.
As for the replacement of our bedroom door, we have decided
on Yontat Doors & will be starting a separate thread on this. So keep a look out for it if you are
interested in reading more about our shopping trip for wooden bedroom doors :)
Now that Ah Cheong has finally completed our
mini-renovation, he had arranged for his worker to drop by at our place a
couple of days after to clear away all their personal effects such as
equipments, unused raw materials, etc.
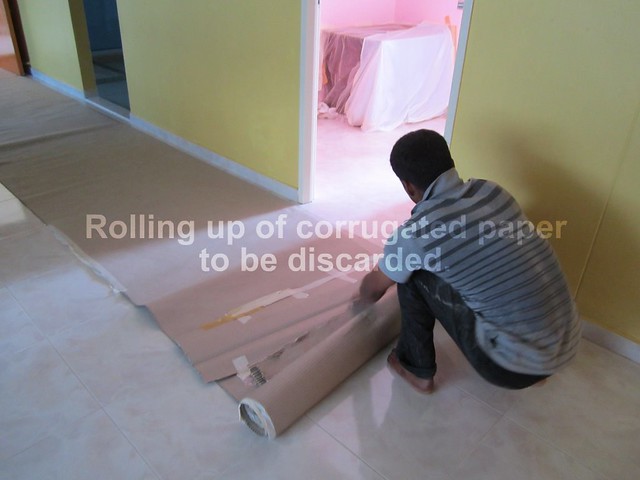
The worker was very careful when clearing away heavy stuff.
And he did a very thorough clean-up of our MBR prior to
peeling all the corrugated paper off our floor tiles.
Payment was then collected over weekends after he had
inspected what his team had done for our flat.
An extremely busy but responsible person.
Post-Renovation Advice:
He had also given us post-renovation advice and we are very
grateful for having benefited from his initiatives.
(A) Timing of painting fabricated walls
Ah Cheong had strongly recommended that we paint the newly
fabricated walls a month after its completion by Ah Ming. That's if we could spare the waiting time -
we could since it's DIY.
As this would allow the walls more time to "cure"
completely.
I imagined that since it is freshly built, after the water
evaporates from the walls, they would definitely start shrinking abit.
And that is when we will actually know how good the quality
of the fabricated wall is...
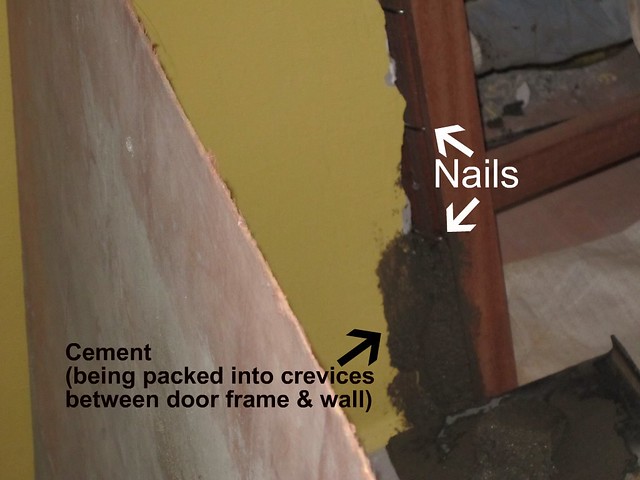
(B) How to deal with cracks at the "Joint"
edges
Ah Cheong had assured us that there will be no cracks coming
from the smooth & flat surfaces of the fabricated walls except the edges
where the fabricated walls are "joined" to the existing (HDB) wall
when the wall cures (contraction as most fluid contents would have evaporated
from the walls by then).
We are to use brown silicon (I saw it in hardware shops
& it comes in the form of a brown putty that's used for sealing up cracks
in walls; also shown in NIPPON's online videos) to mend the cracks at the
"joints" prior to repainting it.
http://www.nipponpaint.com.sg/advice/diy-painting-tips-videos/mending-walls
(Post Mortem : There were really fine hair-line cracks at the "joints", which my hubby used an instant putty filler to mend it over with his fingers. This is done at least a few days prior to painting.)
(C) Using an oil-based primer
And he had also given clear instructions that the wall must
be painted with an oil-based sealer prior to a fresh coat of paint, etc etc
etc.
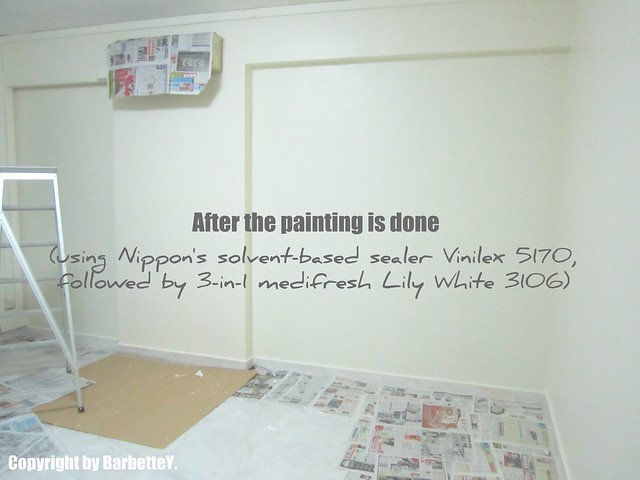
We decided to purchase a 20-litre calibration of NIPPON's
Vinilex 5170 to prime the fabricated walls in the bedrooms, all the rooms &
the ceiling. We are hoping that the
painting would last longer even though the old coats of paint turned patchy
after 8 years of application.
Our verdict for Ah Cheong's services & workmanship is SUPERB & EXCELLENT!
Please do not underestimate the scale of our project posted here becox it involved a great deal of technical skills & connections in getting things right the very first time. And especially we are owners who are still staying in the flat while the reno is on-going AND when our tiling is already in place.
Alot of "gong-fu" is required to do such a brilliant job!
And should we require reno services in the near future, he
would definitely be a top priority in our list of renovators.
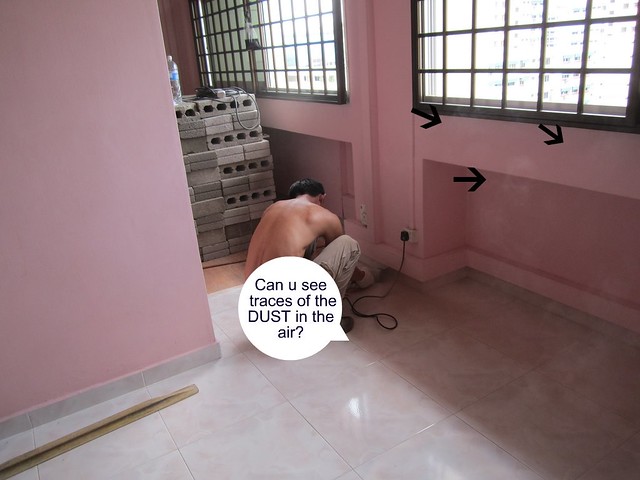
This is how one of the fabricated walls & the door frame
looked like now (20 days from completion date of fabricated walls i.e. DAY 23
of reno start date):
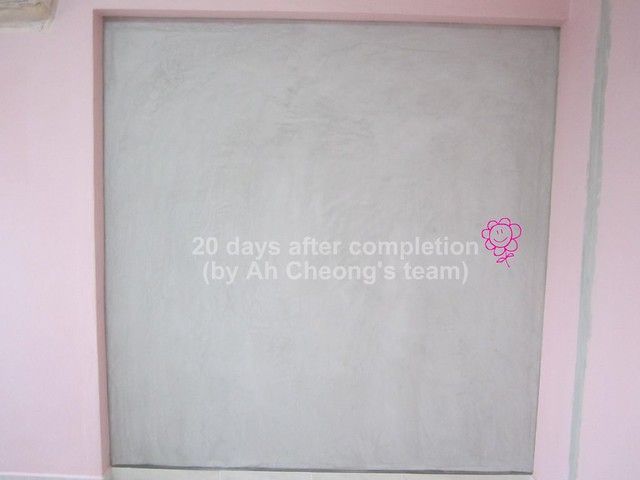
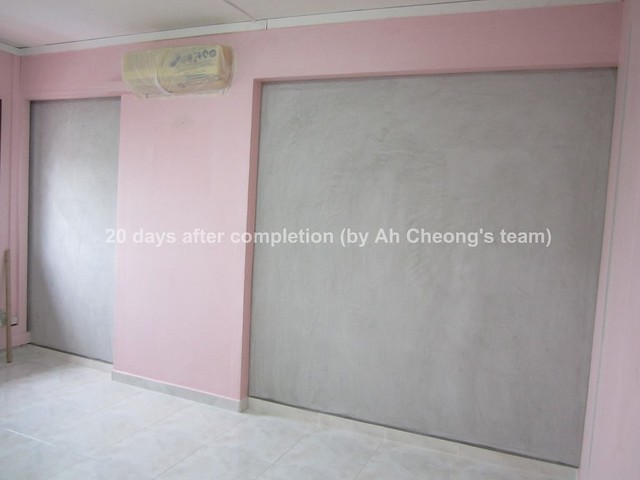

[Note: walls in the photos looked distorted becox of the
angle in which they were taken based on natural lighting in the bedrooms. Actual walls were upright & very
straight as seen in earlier photos in this thread.]
There are another 10 more days or so to go before we could
prime it for painting. But we will be
shelfing the painting of these walls further becox we still cannot find time to
DIY painting & many other stuff in our flat yet.
We're also waiting for the "joints" to crack,
which until today, we haven't seen any yet.
So to play safe in ensuring that the wall is further aired dry, we shall
wait beyond 1 month before we start painting.
And this gives us time to stretch our muscles & relax
too!
Meanwhile, I would be starting a new entry on the following so please stay tuned for updates if they do interest you:
Yontat Doors & Hardware Pte Ltd
Sliding Doors & Vanity drawers from Han Fong Aluminium Pte Ltd
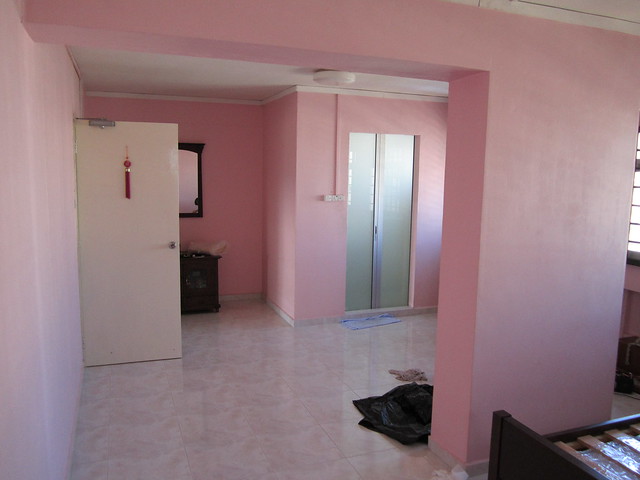
Post Mortem : 6 months AFTER the renovation was conducted ...
We've painted one of the bedrooms (MBR) recently before the
Chinese New Year & this is how it looked like with its new image.
Due to the poor lighting in the evening, the room looks
dimmed out.
The photograph below has marked out the locations of the 2
newly created walls:
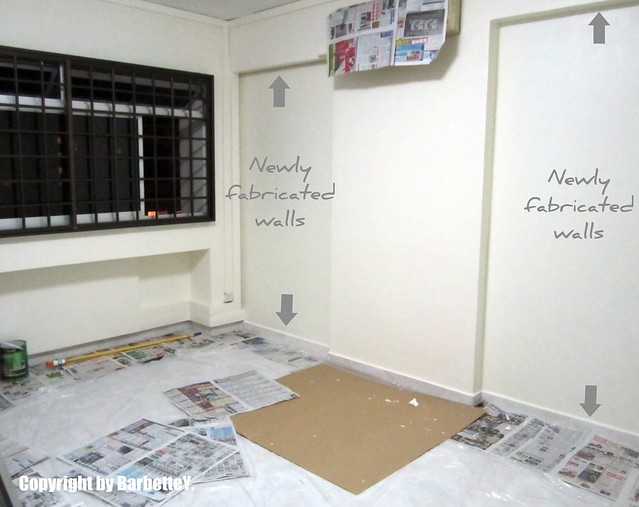
More photos pending upload
_________________________________________________________________________________
Disclaimer:
Permission has been sought from our contractor, Ah Cheong for his renovation works at my home to be featured in this thread.
Kindly note that this thread is strictly for the purpose of sharing my humble & objective views of works and services provided by the aforesaid contractor.
Reader's discretion is therefore sought when viewing this thread.
In view of issues pertaining to every individual's privacy, facial identities are witheld from the photographs featured in this thread.
Thank you for your kind understanding.
_________________________________________________________________________________
No comments:
Post a Comment